วิธีเพิ่มลายเซ็นในการตอบกลับหรือส่งต่อข้อความใน Outlook
หลังจากสร้างลายเซ็นใหม่แล้วลายเซ็นจะถูกระบุโดยอัตโนมัติเป็นลายเซ็นเริ่มต้นสำหรับข้อความใหม่ทั้งหมดภายใต้บัญชีอีเมลของคุณ สำหรับอีเมลตอบกลับหรือส่งต่อใน Outlook คุณต้องเลือกลายเซ็นด้วยตนเอง จริงๆแล้วคุณยังสามารถระบุลายเซ็นเป็นลายเซ็นเริ่มต้นสำหรับอีเมลตอบกลับหรืออีเมลทั้งหมดใน Outlook โปรดเรียกดูบทช่วยสอนด้านล่างสำหรับการเพิ่มลายเซ็นในการตอบกลับหรืออีเมลที่ส่งต่อโดยอัตโนมัติใน Outlook
เพิ่มลายเซ็นในการตอบกลับหรืออีเมลที่ส่งต่อใน Outlook
- ส่งอีเมลอัตโนมัติด้วย CC อัตโนมัติ / BCC, ส่งต่ออัตโนมัติ ตามกฎ; ส่ง ตอบอัตโนมัติ (Out of Office) โดยไม่ต้องใช้ Exchange Server...
- รับการแจ้งเตือนเช่น คำเตือน BCC เมื่อตอบกลับทุกคนในขณะที่คุณอยู่ในรายการ BCC และ เตือนเมื่อไม่มีไฟล์แนบ สำหรับความผูกพันที่ถูกลืม...
- ปรับปรุงประสิทธิภาพอีเมลด้วย ตอบกลับ (ทั้งหมด) พร้อมไฟล์แนบ, เพิ่มคำทักทายหรือวันที่ & เวลาลงในลายเซ็นหรือหัวเรื่องโดยอัตโนมัติ, ตอบกลับอีเมลหลายฉบับ...
- เพิ่มความคล่องตัวในการส่งอีเมลด้วย เรียกคืนอีเมล, เครื่องมือแนบ (บีบอัดทั้งหมด, บันทึกอัตโนมัติทั้งหมด...), ลบรายการที่ซ้ำกันและ รายงานด่วน...
 เพิ่มลายเซ็นในการตอบกลับหรืออีเมลที่ส่งต่อใน Outlook
สำหรับการเพิ่มลายเซ็นในการตอบกลับหรืออีเมลที่ส่งต่อใน Outlook โปรดดำเนินการดังนี้
1. สร้างข้อความอีเมลใหม่จากนั้นคลิก ลายเซ็น > ลายเซ็น ใน รวมไปถึง กลุ่มภายใต้ ระบุความประสงค์หรือขอข้อมูลเพิ่มเติม แท็บ ดูภาพหน้าจอ:

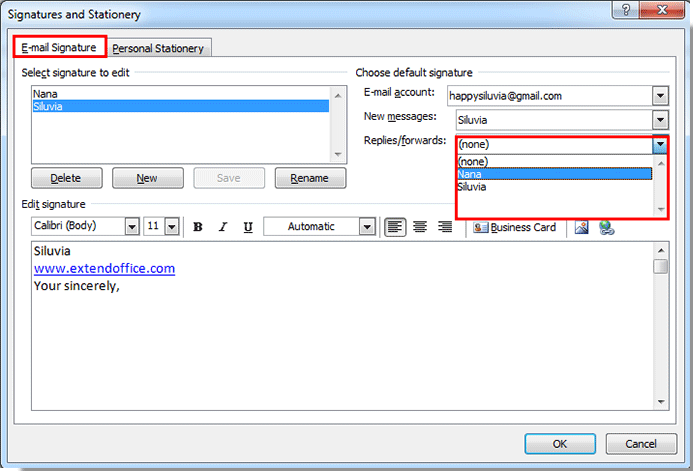
2 ใน ลายเซ็นและเครื่องเขียน กล่องโต้ตอบภายใต้ ลายเซ็นอีเมล เลือกลายเซ็นที่คุณสร้างในไฟล์ ตอบกลับ / ส่งต่อ รายการแบบเลื่อนลงภายใต้ เลือกลายเซ็นเริ่มต้น แล้วคลิกไฟล์ OK ปุ่ม
หมายเหตุ / รายละเอียดเพิ่มเติม:
1. คุณจะเห็นว่ามีบัญชีอีเมลแสดงอยู่บนไฟล์ บัญชีอีเมล์ หลังจากคลิกที่ไฟล์ OK ปุ่มการตั้งค่าทั้งหมดจะเปิดใช้งานภายใต้บัญชีอีเมลนี้
2. หากมีบัญชีอีเมลหลายบัญชีใน Outlook ของคุณคุณต้องระบุลายเซ็นเริ่มต้นให้กับบัญชีอีเมลทั้งหมดทีละบัญชีด้วยวิธีการข้างต้นหากคุณต้องการ
4. คุณยังสามารถเปลี่ยนลายเซ็นสำหรับข้อความใหม่ทั้งหมดภายใต้บัญชีใดบัญชีหนึ่งได้โดยเลือกลายเซ็นใหม่ในไฟล์ ข้อความใหม่ รายการแบบหล่นลง
หลังจากนั้นเมื่อคุณตอบกลับหรือส่งต่อข้อความอีเมลลายเซ็นที่คุณระบุจะถูกเพิ่มลงในเนื้อหาอีเมลโดยอัตโนมัติ
สุดยอดเครื่องมือเพิ่มผลผลิตในสำนักงาน
Kutools สำหรับ Outlook - คุณสมบัติอันทรงพลังมากกว่า 100 รายการเพื่อเติมพลังให้กับ Outlook ของคุณ
🤖 ผู้ช่วยจดหมาย AI: ส่งอีเมลระดับมืออาชีพทันทีด้วยเวทมนตร์ AI คลิกเพียงครั้งเดียวเพื่อตอบกลับอย่างชาญฉลาด น้ำเสียงที่สมบูรณ์แบบ การเรียนรู้หลายภาษา เปลี่ยนรูปแบบการส่งอีเมลอย่างง่ายดาย! ...
📧 การทำงานอัตโนมัติของอีเมล: ไม่อยู่ที่สำนักงาน (ใช้ได้กับ POP และ IMAP) / กำหนดการส่งอีเมล / Auto CC/BCC ตามกฎเมื่อส่งอีเมล / ส่งต่ออัตโนมัติ (กฎขั้นสูง) / เพิ่มคำทักทายอัตโนมัติ / แบ่งอีเมลผู้รับหลายรายออกเป็นข้อความส่วนตัวโดยอัตโนมัติ ...
📨 การจัดการอีเมล์: เรียกคืนอีเมลได้อย่างง่ายดาย / บล็อกอีเมลหลอกลวงตามหัวเรื่องและอื่นๆ / ลบอีเมลที่ซ้ำกัน / การค้นหาขั้นสูง / รวมโฟลเดอร์ ...
📁 ไฟล์แนบโปร: บันทึกแบทช์ / การแยกแบทช์ / การบีบอัดแบบแบตช์ / บันทึกอัตโนมัติ / ถอดอัตโนมัติ / บีบอัดอัตโนมัติ ...
🌟 อินเตอร์เฟซเมจิก: 😊อีโมจิที่สวยและเจ๋งยิ่งขึ้น / เพิ่มประสิทธิภาพการทำงาน Outlook ของคุณด้วยมุมมองแบบแท็บ / ลดขนาด Outlook แทนที่จะปิด ...
???? เพียงคลิกเดียวสิ่งมหัศจรรย์: ตอบกลับทั้งหมดด้วยไฟล์แนบที่เข้ามา / อีเมลต่อต้านฟิชชิ่ง / 🕘 แสดงโซนเวลาของผู้ส่ง ...
👩🏼🤝👩🏻 รายชื่อและปฏิทิน: แบทช์เพิ่มผู้ติดต่อจากอีเมลที่เลือก / แบ่งกลุ่มผู้ติดต่อเป็นกลุ่มแต่ละกลุ่ม / ลบการแจ้งเตือนวันเกิด ...
เกิน คุณสมบัติ 100 รอการสำรวจของคุณ! คลิกที่นี่เพื่อค้นพบเพิ่มเติม

