วิธีแชร์กลุ่มผู้ติดต่อ (รายชื่อการแจกจ่าย) ใน Outlook
สมมติว่าคุณต้องการแบ่งปันกลุ่มที่ติดต่อกับเพื่อนร่วมงานคุณจะแบ่งปันได้อย่างไร และจะเกิดอะไรขึ้นถ้าบันทึกกลุ่มผู้ติดต่อที่ส่งถึงคุณใน Outlook? บทความนี้พูดถึงการแชร์กลุ่มผู้ติดต่อใน Outlook
- แบ่งปันกลุ่มที่ติดต่อของคุณ (รายชื่อการแจกจ่าย) ใน Outlook กับผู้ใช้รายอื่น
- แบ่งปัน / บันทึกกลุ่มผู้ติดต่อ (รายชื่อการแจกจ่าย) ที่ส่งถึงคุณใน Outlook
แบ่งปันกลุ่มที่ติดต่อของคุณ (รายชื่อการแจกจ่าย) ใน Outlook กับผู้ใช้รายอื่น
หากคุณต้องการแบ่งปันกลุ่มที่ติดต่อของคุณใน Outlook กับผู้อื่นคุณสามารถทำได้ดังนี้:
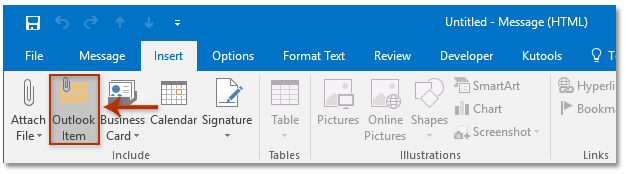
1 ใน จดหมาย ดูสร้างอีเมลใหม่ด้วยการคลิก หน้าแรก > อีเมลใหม่.
2. ในหน้าต่างข้อความใหม่โปรดคลิก สิ่งที่ใส่เข้าไป > รายการ Outlook. ดูภาพหน้าจอ:
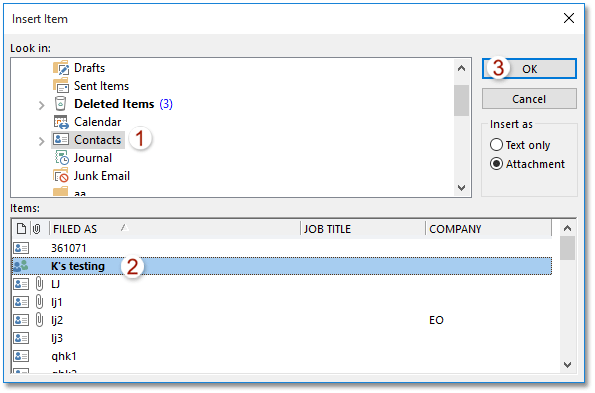
3. ในการเปิดกล่องโต้ตอบแทรกรายการโปรด:
(1) ไปที่ไฟล์ มองใน คลิกเพื่อเลือกไฟล์ ติดต่อ โฟลเดอร์ที่มีกลุ่มผู้ติดต่อที่คุณจะแบ่งปัน
(2) ไปที่ไฟล์ รายการ และคลิกเพื่อเลือกกลุ่มผู้ติดต่อหนึ่งกลุ่มหรือหลายกลุ่มที่คุณจะแบ่งปัน
(3) คลิกไฟล์ OK ปุ่ม. ดูภาพหน้าจอ:
4. ตอนนี้กลุ่มผู้ติดต่อที่เลือกจะถูกเพิ่มเป็นไฟล์แนบในอีเมลใหม่ กรุณาเขียนอีเมลและส่ง
แบ่งปัน / บันทึกกลุ่มผู้ติดต่อ (รายชื่อการแจกจ่าย) ที่ส่งถึงคุณใน Outlook
หากคุณได้รับอีเมลที่มีกลุ่มผู้ติดต่อที่แชร์คุณสามารถคัดลอกและบันทึกกลุ่มที่ติดต่อไปยังโฟลเดอร์ที่ติดต่อของคุณใน Outlook ได้อย่างง่ายดาย
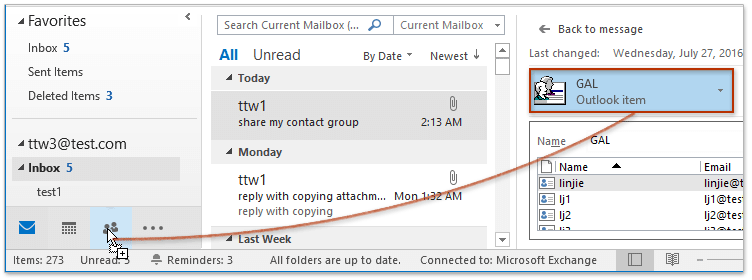
1 ใน จดหมาย ดูคลิกเพื่อเปิดอีเมลที่มีไฟล์แนบกลุ่มผู้ติดต่อในไฟล์ บานหน้าต่างการอ่าน.
2. เลือกกลุ่มผู้ติดต่อใน บานหน้าต่างการอ่านลากไปที่ไอคอน People ![]() or
or ![]() บนบานหน้าต่างนำทางจากนั้นปล่อยเมาส์จนกระทั่งเคอร์เซอร์เปลี่ยนเป็น
บนบานหน้าต่างนำทางจากนั้นปล่อยเมาส์จนกระทั่งเคอร์เซอร์เปลี่ยนเป็น![]() . ดูภาพหน้าจอ:
. ดูภาพหน้าจอ:
จนถึงขณะนี้กลุ่มผู้ติดต่อที่ระบุซึ่งคนอื่นแชร์กับคุณได้ถูกคัดลอกและบันทึกไว้ในโฟลเดอร์รายชื่อของคุณ
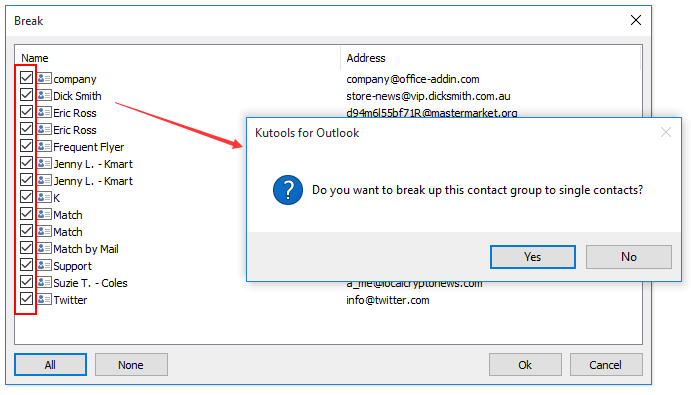
Batch บันทึกสมาชิกแต่ละคนของกลุ่มผู้ติดต่อ (รายชื่อการแจกจ่าย) เป็นผู้ติดต่อแต่ละรายใน Outlook
ด้วย Kutools for Outlook's แบ่งกลุ่มผู้ติดต่อ คุณสามารถบันทึกสมาชิกที่เลือกทั้งหมดหรือหลายคนไปยังผู้ติดต่อแต่ละรายใน Outlook ได้อย่างรวดเร็ว
บทความที่เกี่ยวข้อง
เพิ่มผู้ติดต่อจากรายชื่อการแจกจ่าย (กลุ่มผู้ติดต่อ) ใน Outlook
เพิ่มผู้ส่งอีเมลหลายรายในรายชื่อการแจกจ่าย (กลุ่มผู้ติดต่อ) ใน Outlook
พิมพ์รายชื่อการแจกจ่าย (กลุ่มผู้ติดต่อ) บนหน้าเดียวใน Outlook
สุดยอดเครื่องมือเพิ่มผลผลิตในสำนักงาน
Kutools สำหรับ Outlook - คุณสมบัติอันทรงพลังมากกว่า 100 รายการเพื่อเติมพลังให้กับ Outlook ของคุณ
🤖 ผู้ช่วยจดหมาย AI: ส่งอีเมลระดับมืออาชีพทันทีด้วยเวทมนตร์ AI คลิกเพียงครั้งเดียวเพื่อตอบกลับอย่างชาญฉลาด น้ำเสียงที่สมบูรณ์แบบ การเรียนรู้หลายภาษา เปลี่ยนรูปแบบการส่งอีเมลอย่างง่ายดาย! ...
📧 การทำงานอัตโนมัติของอีเมล: ไม่อยู่ที่สำนักงาน (ใช้ได้กับ POP และ IMAP) / กำหนดการส่งอีเมล / Auto CC/BCC ตามกฎเมื่อส่งอีเมล / ส่งต่ออัตโนมัติ (กฎขั้นสูง) / เพิ่มคำทักทายอัตโนมัติ / แบ่งอีเมลผู้รับหลายรายออกเป็นข้อความส่วนตัวโดยอัตโนมัติ ...
📨 การจัดการอีเมล์: เรียกคืนอีเมลได้อย่างง่ายดาย / บล็อกอีเมลหลอกลวงตามหัวเรื่องและอื่นๆ / ลบอีเมลที่ซ้ำกัน / การค้นหาขั้นสูง / รวมโฟลเดอร์ ...
📁 ไฟล์แนบโปร: บันทึกแบทช์ / การแยกแบทช์ / การบีบอัดแบบแบตช์ / บันทึกอัตโนมัติ / ถอดอัตโนมัติ / บีบอัดอัตโนมัติ ...
🌟 อินเตอร์เฟซเมจิก: 😊อีโมจิที่สวยและเจ๋งยิ่งขึ้น / เพิ่มประสิทธิภาพการทำงาน Outlook ของคุณด้วยมุมมองแบบแท็บ / ลดขนาด Outlook แทนที่จะปิด ...
???? เพียงคลิกเดียวสิ่งมหัศจรรย์: ตอบกลับทั้งหมดด้วยไฟล์แนบที่เข้ามา / อีเมลต่อต้านฟิชชิ่ง / 🕘 แสดงโซนเวลาของผู้ส่ง ...
👩🏼🤝👩🏻 รายชื่อและปฏิทิน: แบทช์เพิ่มผู้ติดต่อจากอีเมลที่เลือก / แบ่งกลุ่มผู้ติดต่อเป็นกลุ่มแต่ละกลุ่ม / ลบการแจ้งเตือนวันเกิด ...
เกิน คุณสมบัติ 100 รอการสำรวจของคุณ! คลิกที่นี่เพื่อค้นพบเพิ่มเติม

