วิธีเก็บเอกสารแนบเมื่อตอบกลับใน Outlook?
เมื่อเราส่งต่อข้อความอีเมลใน Microsoft Outlook ไฟล์แนบต้นฉบับในข้อความอีเมลนี้จะยังคงอยู่ในข้อความที่ส่งต่อ อย่างไรก็ตามเมื่อเราตอบกลับข้อความอีเมลไฟล์แนบต้นฉบับจะไม่ถูกแนบมาในข้อความตอบกลับใหม่ ที่นี่เราจะแนะนำเทคนิคสองสามประการเกี่ยวกับการเก็บไฟล์แนบต้นฉบับเมื่อตอบกลับใน Microsoft Outlook
ตอบกลับพร้อมไฟล์แนบโดยการคัดลอกและวางด้วยตนเอง
ตอบกลับพร้อมไฟล์แนบโดยอัตโนมัติโดย VBA
คลิกเพียงครั้งเดียวเพื่อตอบกลับพร้อมไฟล์แนบด้วย Kutools for Outlook
ตอบกลับพร้อมไฟล์แนบโดยการคัดลอกและวางด้วยตนเอง
เราสามารถคัดลอกไฟล์แนบต้นฉบับในข้อความอีเมลด้วยตนเองและวางในหน้าต่างข้อความตอบกลับเมื่อเราตอบกลับข้อความอีเมลในภายหลัง
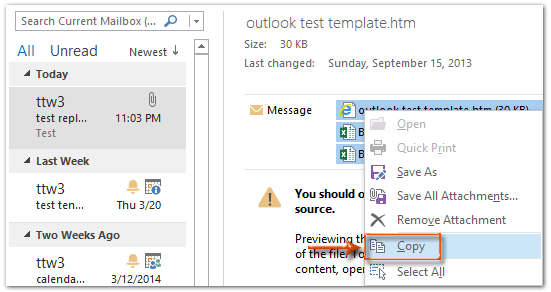
ขั้นตอนที่ 1: คลิกข้อความอีเมลเพื่อดูตัวอย่างในบานหน้าต่างการอ่าน
ขั้นตอนที่ 2: คลิกขวาที่ไฟล์แนบหนึ่งไฟล์ในข้อความอีเมลแสดงตัวอย่างและเลือกไฟล์ เลือกทั้งหมด จากเมนูคลิกขวา
ขั้นตอนที่ 3: คลิกขวาที่ไฟล์แนบที่เลือกแล้วเลือกไฟล์ คัดลอก จากเมนูคลิกขวา
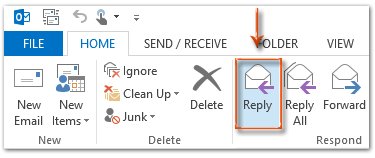
ขั้นตอนที่ 4: ตอบกลับข้อความอีเมลโดยคลิกที่ไฟล์ ตอบ ปุ่มบน หน้าแรก แท็บ (หรือบน Toolbar ใน Outlook 2007)
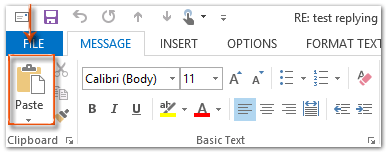
ขั้นตอนที่ 5: ในหน้าต่างข้อความตอบกลับคลิกไฟล์ พาสต้า ปุ่มบน ระบุความประสงค์หรือขอข้อมูลเพิ่มเติม เพื่อวางไฟล์แนบเหล่านี้
หากคุณกำลังใช้ Outlook 2013 หรือเวอร์ชันที่ใหม่กว่าให้คลิกไฟล์ เปิดออก ที่มุมซ้ายบนของบานหน้าต่างการอ่านเพื่อปล่อยหน้าต่างข้อความตอบกลับ คลิกเพื่อทราบข้อมูลเพิ่มเติม ...
ขั้นตอนที่ 6: เขียนข้อความตอบกลับและคลิกไฟล์ ส่ง ปุ่ม
ตอบกลับอีเมลได้อย่างง่ายดายด้วยไฟล์แนบต้นฉบับใน Outlook:
Kutools สำหรับ Outlook's ตอบกลับด้วยไฟล์แนบ ยูทิลิตี้สามารถช่วยให้คุณตอบกลับอีเมลที่ได้รับได้อย่างง่ายดายด้วยไฟล์แนบต้นฉบับใน Outlook ดูการสาธิตด้านล่าง:
ดาวน์โหลดและทดลองใช้ทันที! (เส้นทางฟรี 60 วัน)

ตอบกลับพร้อมไฟล์แนบโดยอัตโนมัติโดย VBA
มีมาโคร VBA ที่สามารถช่วยคุณตอบกลับพร้อมไฟล์แนบต้นฉบับโดยอัตโนมัติ
หมายเหตุ: ก่อนที่คุณจะเรียกใช้แมโคร VBA คุณต้อง เปิดใช้งานแมโครใน Microsoft Outlook.
ขั้นตอนที่ 1: เลือกข้อความอีเมลที่คุณจะตอบกลับพร้อมไฟล์แนบ
ขั้นตอนที่ 2: กดปุ่ม อื่น ๆ + F11 ปุ่มเพื่อเปิดหน้าต่าง Microsoft Visual Basic for Applications
ขั้นตอนที่ 3: ขยาย Project1 และ Microsoft Outlook Objects ในแถบด้านซ้ายและดับเบิลคลิกที่ไฟล์ นี้OutlookSession เพื่อเปิด
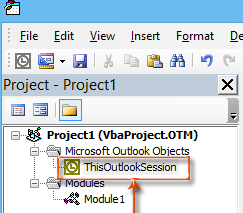
ขั้นตอนที่ 4: วางรหัสต่อไปนี้ลงในหน้าต่าง ThisOutlookSession
Sub RunReplyWithAttachments()
'Update by Extendoffice 20180830
    Dim xReplyItem As Outlook.MailItem
    Dim xItem As Object
    On Error Resume Next
    Set xItem = GetCurrentItem()
    If xItem Is Nothing Then Exit Sub
    Set xReplyItem = xItem.Reply
    CopyAttachments xItem, xReplyItem
    xReplyItem.Display
    Set xReplyItem = Nothing
    Set xItem = Nothing
End Sub
Sub RunReplyAllWithAttachments()
    Dim xReplyAllItem As Outlook.MailItem
    Dim xItem As Object
    Set xItem = GetCurrentItem()
    If xItem Is Nothing Then Exit Sub
    Set xReplyAllItem = xItem.ReplyAll
    CopyAttachments xItem, xReplyAllItem
    xReplyAllItem.Display
    Set xReplyAllItem = Nothing
    Set xItem = Nothing
End Sub

Function GetCurrentItem() As Object
    On Error Resume Next
    Select Case TypeName(Application.ActiveWindow)
        Case "Explorer"
            Set GetCurrentItem = Application.ActiveExplorer.Selection.Item(1)
        Case "Inspector"
            Set GetCurrentItem = Application.ActiveInspector.currentItem
    End Select
End Function

Sub CopyAttachments(SourceItem As MailItem, TargetItem As MailItem)
    Dim xFilePath As String
    Dim xAttachment As Attachment
    Dim xFSO As Scripting.FileSystemObject
    Dim xTmpFolder As Scripting.Folder
    Dim xFldPath As String
    Set xFSO = New Scripting.FileSystemObject
    Set xTmpFolder = xFSO.GetSpecialFolder(2)
    xFldPath = xTmpFolder.Path & "\"
    For Each xAttachment In SourceItem.Attachments
        If IsEmbeddedAttachment(xAttachment) = False Then
            xFilePath = xFldPath & xAttachment.Filename
            xAttachment.SaveAsFile xFilePath
            TargetItem.Attachments.Add xFilePath, , , xAttachment.DisplayName
            xFSO.DeleteFile xFilePath
        End If
    Next
    Set xFSO = Nothing
    Set xTmpFolder = Nothing
End Sub

Function IsEmbeddedAttachment(Attach As Attachment)
    Dim xAttParent As Object
    Dim xCID As String, xID As String
    Dim xHTML As String
    On Error Resume Next
    Set xAttParent = Attach.Parent
    xCID = ""
    xCID = Attach.PropertyAccessor.GetProperty("http://schemas.microsoft.com/mapi/proptag/0x3712001F")
    If xCID <> "" Then
        xHTML = xAttParent.HTMLBody
        xID = "cid:" & xCID
        If InStr(xHTML, xID) > 0 Then
            IsEmbeddedAttachment = True
        Else
            IsEmbeddedAttachment = False
        End If
    End If
End Function
ขั้นตอนที่ 5: กดปุ่ม F5 กุญแจสำคัญในการเรียกใช้แมโครนี้ ในการเปิด แมโคร คลิกตกลง เรียกใช้ตอบกลับทั้งหมดด้วยไฟล์แนบ หากคุณต้องการตอบกลับทุกคนพร้อมไฟล์แนบ มิฉะนั้นให้เลือก เรียกใช้ตอบกลับด้วยไฟล์แนบ จากนั้นคลิกที่ วิ่ง ปุ่ม
จากนั้นจะเปิดหน้าต่างข้อความตอบกลับพร้อมแนบไฟล์แนบต้นฉบับทั้งหมด
ขั้นตอนที่ 6: เขียนข้อความตอบกลับแล้วคลิก ส่ง ปุ่ม
ตอบกลับพร้อมไฟล์แนบโดยอัตโนมัติด้วย Kutools for Outlook
พื้นที่ ตอบกลับด้วยไฟล์แนบ ประโยชน์ของ Kutools สำหรับ Outlook สามารถช่วยคุณตอบกลับอีเมลพร้อมไฟล์แนบต้นฉบับได้ในคลิกเดียว
Kutools สำหรับ Outlook : ด้วยโปรแกรมเสริม Outlook ที่มีประโยชน์มากกว่า 100+ รายการ ทดลองใช้ฟรีโดยไม่มีข้อ จำกัด ภายใน 60 วัน.
1. เลือกอีเมลที่มีไฟล์แนบที่คุณต้องการตอบกลับ
2 จากนั้นคลิก Kutools > ตอบกลับด้วยไฟล์แนบ > ตอบกลับด้วยไฟล์แนบ. ดูภาพหน้าจอ:
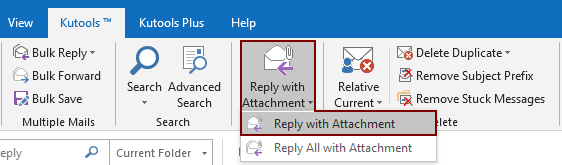
จากนั้นไฟล์แนบทั้งหมดของอีเมลที่เลือกจะปรากฏในไฟล์ ที่แนบมา ฟิลด์ของข้อความตอบกลับ เขียนอีเมลของคุณและส่ง

หากคุณต้องการทดลองใช้ยูทิลิตีนี้ฟรีโปรดไปที่ ดาวน์โหลดซอฟต์แวร์ฟรี ก่อนแล้วไปใช้การดำเนินการตามขั้นตอนข้างต้น
คลิกเพียงครั้งเดียวเพื่อตอบกลับพร้อมไฟล์แนบด้วย Kutools for Outlook
หากคุณต้องการทดลองใช้ยูทิลิตีนี้ฟรี (60 วัน) กรุณาคลิกเพื่อดาวน์โหลดแล้วไปใช้การดำเนินการตามขั้นตอนข้างต้น
บทความที่เกี่ยวข้อง:
- วิธีเก็บเอกสารแนบเมื่อตอบกลับใน Outlook?
- จะบันทึกไฟล์แนบทั้งหมดจากอีเมลหลายฉบับไปยังโฟลเดอร์ใน Outlook ได้อย่างไร
- วิธีลบไฟล์แนบทั้งหมดจากอีเมลใน Outlook
สุดยอดเครื่องมือเพิ่มผลผลิตในสำนักงาน
Kutools สำหรับ Outlook - คุณสมบัติอันทรงพลังมากกว่า 100 รายการเพื่อเติมพลังให้กับ Outlook ของคุณ
🤖 ผู้ช่วยจดหมาย AI: ส่งอีเมลระดับมืออาชีพทันทีด้วยเวทมนตร์ AI คลิกเพียงครั้งเดียวเพื่อตอบกลับอย่างชาญฉลาด น้ำเสียงที่สมบูรณ์แบบ การเรียนรู้หลายภาษา เปลี่ยนรูปแบบการส่งอีเมลอย่างง่ายดาย! ...
📧 การทำงานอัตโนมัติของอีเมล: ไม่อยู่ที่สำนักงาน (ใช้ได้กับ POP และ IMAP) / กำหนดการส่งอีเมล / Auto CC/BCC ตามกฎเมื่อส่งอีเมล / ส่งต่ออัตโนมัติ (กฎขั้นสูง) / เพิ่มคำทักทายอัตโนมัติ / แบ่งอีเมลผู้รับหลายรายออกเป็นข้อความส่วนตัวโดยอัตโนมัติ ...
📨 การจัดการอีเมล์: เรียกคืนอีเมลได้อย่างง่ายดาย / บล็อกอีเมลหลอกลวงตามหัวเรื่องและอื่นๆ / ลบอีเมลที่ซ้ำกัน / การค้นหาขั้นสูง / รวมโฟลเดอร์ ...
📁 ไฟล์แนบโปร: บันทึกแบทช์ / การแยกแบทช์ / การบีบอัดแบบแบตช์ / บันทึกอัตโนมัติ / ถอดอัตโนมัติ / บีบอัดอัตโนมัติ ...
🌟 อินเตอร์เฟซเมจิก: 😊อีโมจิที่สวยและเจ๋งยิ่งขึ้น / เพิ่มประสิทธิภาพการทำงาน Outlook ของคุณด้วยมุมมองแบบแท็บ / ลดขนาด Outlook แทนที่จะปิด ...
???? เพียงคลิกเดียวสิ่งมหัศจรรย์: ตอบกลับทั้งหมดด้วยไฟล์แนบที่เข้ามา / อีเมลต่อต้านฟิชชิ่ง / 🕘 แสดงโซนเวลาของผู้ส่ง ...
👩🏼🤝👩🏻 รายชื่อและปฏิทิน: แบทช์เพิ่มผู้ติดต่อจากอีเมลที่เลือก / แบ่งกลุ่มผู้ติดต่อเป็นกลุ่มแต่ละกลุ่ม / ลบการแจ้งเตือนวันเกิด ...
เกิน คุณสมบัติ 100 รอการสำรวจของคุณ! คลิกที่นี่เพื่อค้นพบเพิ่มเติม

