วิธีกรองและบล็อกอีเมลโดยอัตโนมัติตามชื่อผู้ส่งใน Outlook
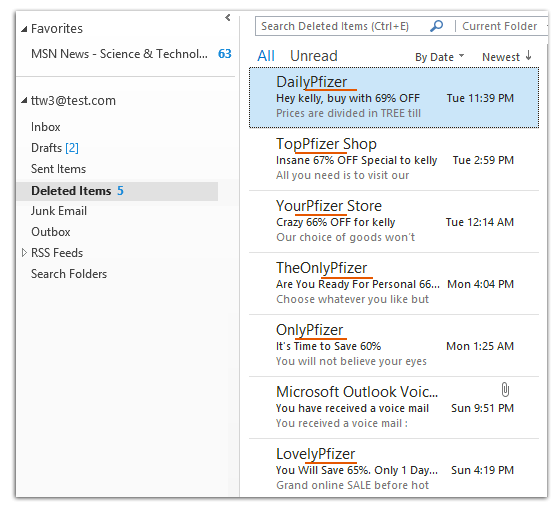
เมื่อเร็ว ๆ นี้ฉันได้รับอีเมลคำแนะนำจำนวนมากซึ่งมีโดเมนผู้ส่งหัวเรื่องและเนื้อหาอีเมลที่แตกต่างกันยกเว้นคำหลักเดียวกันในชื่อที่แสดงของผู้ส่ง ดูภาพหน้าจอด้านล่าง เป็นการยากที่จะยื่นและบล็อกอีเมลคำแนะนำเหล่านี้ด้วยวิธีการอีเมลขยะปกติ โชคดีที่ฉันพบวิธีที่ยุ่งยากในการกรองและบล็อกอีเมลคำแนะนำเหล่านี้ด้วยชื่อที่แสดงของผู้ส่งใน Microsoft Outlook
- ส่งอีเมลอัตโนมัติด้วย CC อัตโนมัติ / BCC, ส่งต่ออัตโนมัติ ตามกฎ; ส่ง ตอบอัตโนมัติ (Out of Office) โดยไม่ต้องใช้ Exchange Server...
- รับการแจ้งเตือนเช่น คำเตือน BCC เมื่อตอบกลับทุกคนในขณะที่คุณอยู่ในรายการ BCC และ เตือนเมื่อไม่มีไฟล์แนบ สำหรับความผูกพันที่ถูกลืม...
- ปรับปรุงประสิทธิภาพอีเมลด้วย ตอบกลับ (ทั้งหมด) พร้อมไฟล์แนบ, เพิ่มคำทักทายหรือวันที่ & เวลาลงในลายเซ็นหรือหัวเรื่องโดยอัตโนมัติ, ตอบกลับอีเมลหลายฉบับ...
- เพิ่มความคล่องตัวในการส่งอีเมลด้วย เรียกคืนอีเมล, เครื่องมือแนบ (บีบอัดทั้งหมด, บันทึกอัตโนมัติทั้งหมด...), ลบรายการที่ซ้ำกันและ รายงานด่วน...
วิธีนี้จะแนะนำให้คุณสร้างกฎใน Microsoft Outlook จากนั้นกฎจะกรองและบล็อกข้อความอีเมลตามชื่อที่แสดงของผู้ส่งโดยอัตโนมัติเมื่อมีอีเมลเข้ามา
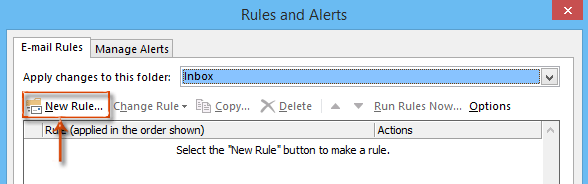
ขั้นตอนที่ 1: เลื่อนไปที่มุมมองจดหมายและเปิดกล่องโต้ตอบกฎและการแจ้งเตือน
- ใน Outlook 2007 โปรดคลิกไฟล์ เครื่องมือ > กฎและการแจ้งเตือน.
- ใน Outlook 2010 และ 2013 โปรดคลิกไฟล์ กฎระเบียบ > กฎและการแจ้งเตือนของผู้จัดการ บน หน้าแรก แถบ

ขั้นตอนที่ 2: ในกล่องโต้ตอบกฎและการแจ้งเตือนโปรดคลิกที่ไฟล์ กฎใหม่ ปุ่ม
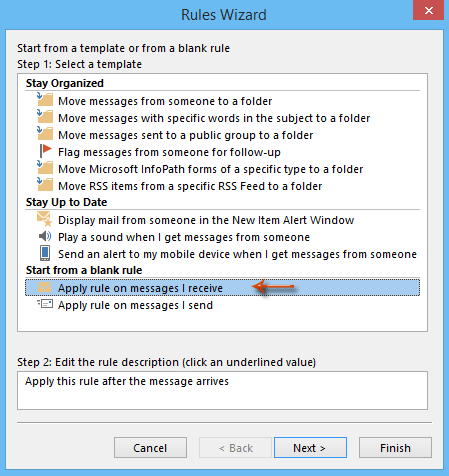
ขั้นตอนที่ 3: ตอนนี้คุณเข้าสู่กล่องโต้ตอบตัวช่วยสร้างกฎ คลิกเพื่อไฮไลต์ไฟล์ ใช้กฎเกี่ยวกับข้อความที่ฉันได้รับ (หรือตรวจสอบข้อความเมื่อมาถึง Outlook 2007) จากนั้นคลิกที่ไฟล์ ถัดไป ปุ่ม
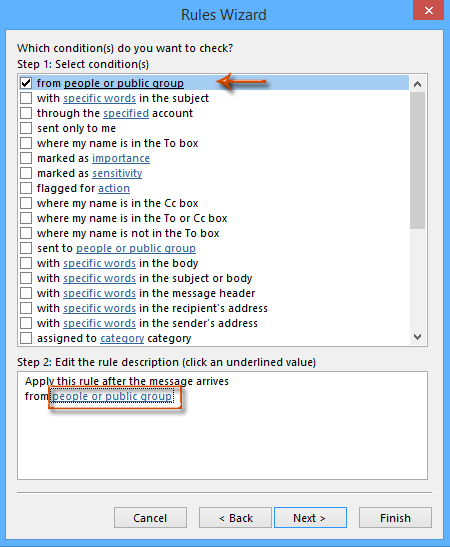
ขั้นตอนที่ 4: ในกล่องโต้ตอบตัวช่วยสร้างกฎที่สองให้ทำเครื่องหมายที่ จากบุคคลหรือกลุ่มสาธารณะแล้วคลิกข้อความของ คนหรือกลุ่มสาธารณะ. ดูภาพหน้าจอ:
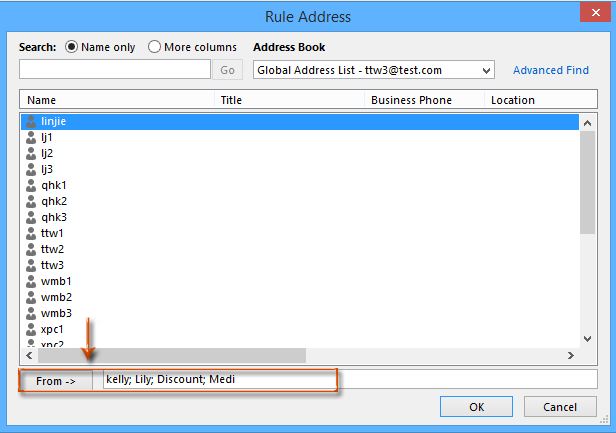
ขั้นตอนที่ 5: จากนั้นกล่องโต้ตอบ Rule Address จะปรากฏขึ้น พิมพ์ชื่อที่แสดงของผู้ส่งที่คุณต้องการกรองอีเมลและบล็อกในไฟล์ จาก แล้วคลิกไฟล์ OK ปุ่ม
หมายเหตุ
- คุณสามารถพิมพ์ชื่อที่แสดงเต็มของผู้ส่งหรือเพียงแค่คำหลักบางคำก็ได้
- แยกชื่อที่แสดงของผู้ส่งหลายชื่อด้วยเครื่องหมายอัฒภาค (;)
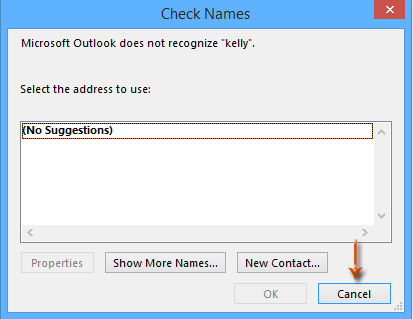
ขั้นตอนที่ 6: ในกล่องโต้ตอบตรวจสอบชื่อที่ปรากฏขึ้นให้คลิกที่ไฟล์ ยกเลิก ปุ่ม
ขั้นตอนที่ 7: ตอนนี้คุณกลับไปที่กล่องโต้ตอบตัวช่วยสร้างกฎแล้วคลิกไฟล์ ถัดไป ปุ่ม
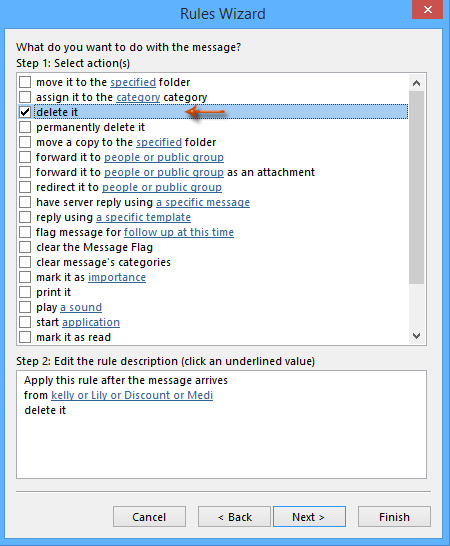
ขั้นตอนที่ 8: ในกล่องโต้ตอบตัวช่วยสร้างกฎที่สามให้ทำเครื่องหมายที่ ลบมัน และคลิกที่ ถัดไป ปุ่ม
ขั้นตอนที่ 9: คลิกปุ่ม ถัดไป ในกล่องโต้ตอบตัวช่วยสร้างกฎที่สี่
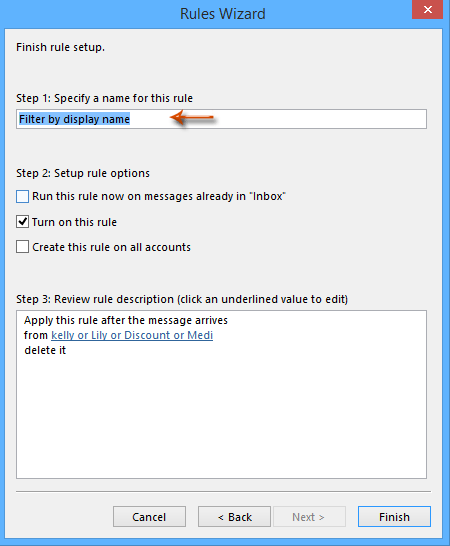
ขั้นตอนที่ 10: ตอนนี้คุณเข้าสู่กล่องโต้ตอบตัวช่วยสร้างกฎที่ห้าพิมพ์ชื่อกฎใหม่นี้ในช่องด้านล่าง ขั้นตอนที่ 1: ระบุชื่อสำหรับกฎนี้และคลิกแท็บ เสร็จสิ้น ปุ่ม
ขั้นตอนที่ 11. จากนั้นจะกลับไปที่ กฎและการแจ้งเตือน โปรดคลิก OK ปุ่มเพื่อดำเนินการตั้งค่าทั้งหมด
หมายเหตุ เป็นทางเลือกในการตรวจสอบตัวเลือกของ เรียกใช้กฎนี้ทันทีกับข้อความที่อยู่ใน“ กล่องจดหมาย”. หากคุณเลือกตัวเลือกนี้ระบบจะกรองและลบข้อความอีเมลที่มีอยู่ทั้งหมดซึ่งชื่อที่แสดงของผู้ส่งตรงตามเงื่อนไขที่คุณระบุในขั้นตอนที่ 5
สุดยอดเครื่องมือเพิ่มผลผลิตในสำนักงาน
Kutools สำหรับ Outlook - คุณสมบัติอันทรงพลังมากกว่า 100 รายการเพื่อเติมพลังให้กับ Outlook ของคุณ
🤖 ผู้ช่วยจดหมาย AI: ส่งอีเมลระดับมืออาชีพทันทีด้วยเวทมนตร์ AI คลิกเพียงครั้งเดียวเพื่อตอบกลับอย่างชาญฉลาด น้ำเสียงที่สมบูรณ์แบบ การเรียนรู้หลายภาษา เปลี่ยนรูปแบบการส่งอีเมลอย่างง่ายดาย! ...
📧 การทำงานอัตโนมัติของอีเมล: ไม่อยู่ที่สำนักงาน (ใช้ได้กับ POP และ IMAP) / กำหนดการส่งอีเมล / Auto CC/BCC ตามกฎเมื่อส่งอีเมล / ส่งต่ออัตโนมัติ (กฎขั้นสูง) / เพิ่มคำทักทายอัตโนมัติ / แบ่งอีเมลผู้รับหลายรายออกเป็นข้อความส่วนตัวโดยอัตโนมัติ ...
📨 การจัดการอีเมล์: เรียกคืนอีเมลได้อย่างง่ายดาย / บล็อกอีเมลหลอกลวงตามหัวเรื่องและอื่นๆ / ลบอีเมลที่ซ้ำกัน / การค้นหาขั้นสูง / รวมโฟลเดอร์ ...
📁 ไฟล์แนบโปร: บันทึกแบทช์ / การแยกแบทช์ / การบีบอัดแบบแบตช์ / บันทึกอัตโนมัติ / ถอดอัตโนมัติ / บีบอัดอัตโนมัติ ...
🌟 อินเตอร์เฟซเมจิก: 😊อีโมจิที่สวยและเจ๋งยิ่งขึ้น / เพิ่มประสิทธิภาพการทำงาน Outlook ของคุณด้วยมุมมองแบบแท็บ / ลดขนาด Outlook แทนที่จะปิด ...
???? เพียงคลิกเดียวสิ่งมหัศจรรย์: ตอบกลับทั้งหมดด้วยไฟล์แนบที่เข้ามา / อีเมลต่อต้านฟิชชิ่ง / 🕘 แสดงโซนเวลาของผู้ส่ง ...
👩🏼🤝👩🏻 รายชื่อและปฏิทิน: แบทช์เพิ่มผู้ติดต่อจากอีเมลที่เลือก / แบ่งกลุ่มผู้ติดต่อเป็นกลุ่มแต่ละกลุ่ม / ลบการแจ้งเตือนวันเกิด ...
เกิน คุณสมบัติ 100 รอการสำรวจของคุณ! คลิกที่นี่เพื่อค้นพบเพิ่มเติม

