Outlook: เปลี่ยนโฟลเดอร์ที่จัดเก็บรายการที่ส่ง
ดังที่คุณทราบข้อความอีเมลที่ส่งจะถูกบันทึกลงในโฟลเดอร์รายการที่ถูกส่งโดยอัตโนมัติ แต่ที่นี่เราจัดเตรียมเทคนิคบางอย่างเกี่ยวกับวิธีการเปลี่ยนโฟลเดอร์รายการที่ส่งเริ่มต้นและบันทึกข้อความอีเมลที่ส่งไปยังโฟลเดอร์ทางเลือกใน Microsoft Outlook ได้อย่างง่ายดาย
เปลี่ยนโฟลเดอร์รายการที่ส่งจะถูกเก็บไว้เมื่อคุณกำลังเขียน
เปลี่ยนโฟลเดอร์รายการที่ส่งทั้งหมดจะถูกจัดเก็บโดยอัตโนมัติ
- ส่งอีเมลอัตโนมัติด้วย CC อัตโนมัติ / BCC, ส่งต่ออัตโนมัติ ตามกฎ; ส่ง ตอบอัตโนมัติ (Out of Office) โดยไม่ต้องใช้ Exchange Server...
- รับการแจ้งเตือนเช่น คำเตือน BCC เมื่อตอบกลับทุกคนในขณะที่คุณอยู่ในรายการ BCC และ เตือนเมื่อไม่มีไฟล์แนบ สำหรับความผูกพันที่ถูกลืม...
- ปรับปรุงประสิทธิภาพอีเมลด้วย ตอบกลับ (ทั้งหมด) พร้อมไฟล์แนบ, เพิ่มคำทักทายหรือวันที่ & เวลาลงในลายเซ็นหรือหัวเรื่องโดยอัตโนมัติ, ตอบกลับอีเมลหลายฉบับ...
- เพิ่มความคล่องตัวในการส่งอีเมลด้วย เรียกคืนอีเมล, เครื่องมือแนบ (บีบอัดทั้งหมด, บันทึกอัตโนมัติทั้งหมด...), ลบรายการที่ซ้ำกันและ รายงานด่วน...
 เปลี่ยนโฟลเดอร์รายการที่ส่งจะถูกเก็บไว้เมื่อคุณกำลังเขียน
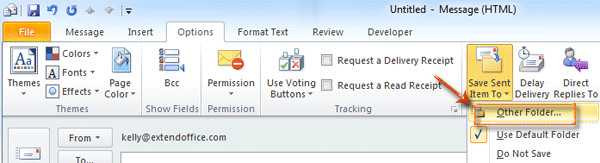
เมื่อคุณเขียนข้อความอีเมลคุณสามารถกำหนดโฟลเดอร์ทางเลือกที่จะจัดเก็บอีเมลที่ส่งนี้หลังจากส่ง
ขั้นตอนที่ 1: คลิกปุ่ม บันทึกรายการที่ส่งไปที่ > โฟลเดอร์อื่น ๆ ใน ตัวเลือกเพิ่มเติม กลุ่มใน Options ในหน้าต่างข้อความ
ขั้นตอนที่ 2: ในกล่องโต้ตอบเลือกโฟลเดอร์ให้เลือกและไฮไลต์โฟลเดอร์ในไฟล์ โฟลเดอร์: แล้วคลิกไฟล์ OK ปุ่ม
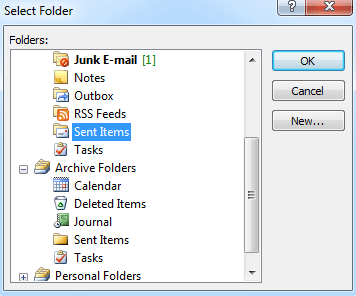
หลังจากที่คุณส่งข้อความอีเมลนี้สำเนาจะถูกจัดเก็บไว้ในโฟลเดอร์ที่คุณเลือกในขั้นตอนที่ 2 โดยอัตโนมัติ
เปลี่ยนโฟลเดอร์รายการที่ส่งทั้งหมดจะถูกจัดเก็บโดยอัตโนมัติ
ในบางกรณีคุณอาจต้องการเปลี่ยนโฟลเดอร์ Sent Item ที่เป็นค่าเริ่มต้นและปล่อยให้ข้อความอีเมลที่ส่งทั้งหมดถูกเก็บไว้ในโฟลเดอร์ที่ระบุโดยอัตโนมัติ เราจะแนะนำให้คุณตระหนักถึงการสร้างกฎใน Outlook
ก่อนที่คุณจะสร้างกฎคุณต้องเปลี่ยนเป็นมุมมองจดหมายโดยคลิกที่ไฟล์ จดหมาย ในบานหน้าต่างนำทาง
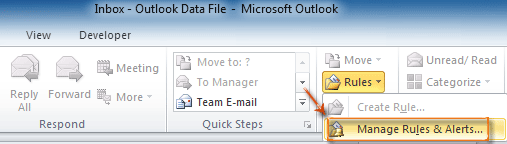
ขั้นตอนที่ 1: เปิดกล่องโต้ตอบกฎและการแจ้งเตือน:
- ใน Outlook 2010 และ 2013 โปรดคลิกไฟล์ กฎระเบียบ > จัดการกฎและการแจ้งเตือน ใน ย้าย กลุ่มใน หน้าแรก แถบ
- ใน Outlook 2007 โปรดคลิกไฟล์ เครื่องมือ > กฎและการแจ้งเตือน.
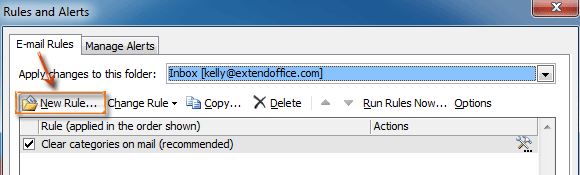
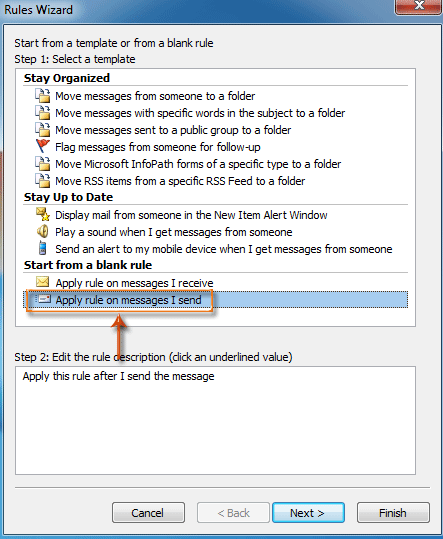
ขั้นตอนที่ 2: ในกล่องโต้ตอบกฎและการแจ้งเตือนให้คลิกปุ่ม กฎใหม่ ปุ่มบน กฎอีเมล แถบ
ขั้นตอนที่ 3: ในกล่องโต้ตอบตัวช่วยสร้างกฎให้เลือกและไฮไลต์ไฟล์ ใช้กฎกับข้อความที่ฉันส่ง ใน เริ่มจากกฎว่าง ส่วนและคลิกปุ่ม ถัดไป ปุ่ม
ขั้นตอนที่ 4: ในกล่องโต้ตอบตัวช่วยสร้างกฎใหม่
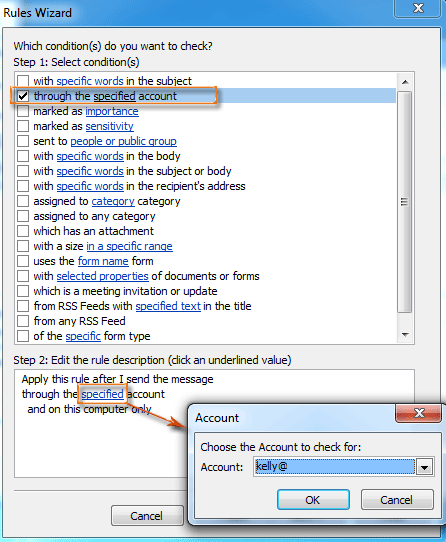
- ตรวจสอบ ผ่านบัญชีที่ระบุ ตัวเลือกใน ขั้นตอนที่ 1: เลือกเงื่อนไข มาตรา.
- คลิก ที่ระบุไว้ ใน ขั้นตอนที่ 2: แก้ไขคำอธิบายกฎ มาตรา.
- ในกล่องโต้ตอบบัญชีที่เปิดขึ้นให้เลือกบัญชีในไฟล์ บัญชี: แล้วคลิก OK ปุ่ม
- คลิก ถัดไป ปุ่ม
ขั้นตอนที่ 5: ในกล่องโต้ตอบตัวช่วยสร้างกฎใหม่
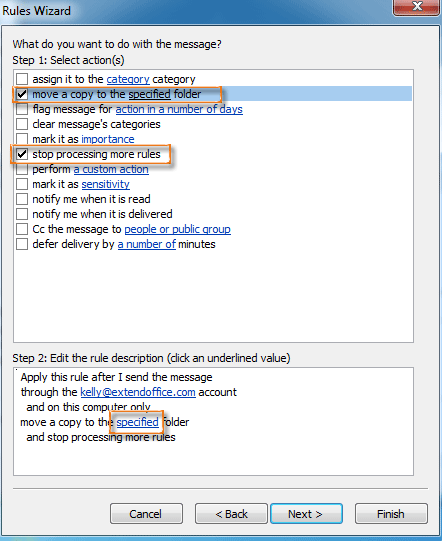
- ตรวจสอบ ย้ายสำเนาไปยังโฟลเดอร์ที่ระบุ ตัวเลือกและ หยุดประมวลผลกฎเพิ่มเติม ตัวเลือกใน ขั้นตอนที่ 1: เลือกการกระทำ มาตรา.
- คลิก ที่ระบุไว้ ใน ขั้นตอนที่ 2: แก้ไขคำอธิบายกฎ มาตรา.
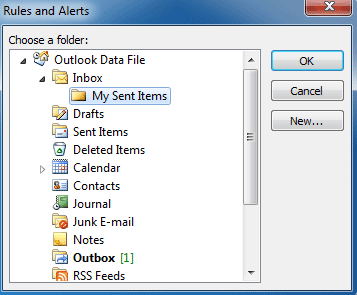
- ในกล่องโต้ตอบกฎและการแจ้งเตือนเลือกโฟลเดอร์แล้วคลิก OK ปุ่ม
- คลิก ถัดไป ปุ่ม
ขั้นตอนที่ 6: คลิกต่อไปที่ไฟล์ ถัดไป ปุ่มและ เสร็จสิ้น ในกล่องโต้ตอบต่อไปนี้
จากนี้ข้อความอีเมลที่ส่งทั้งหมดจะถูกบันทึกลงในโฟลเดอร์ที่คุณกำหนดค่าไว้ในขั้นตอนที่ 5 โดยอัตโนมัติ
สุดยอดเครื่องมือเพิ่มผลผลิตในสำนักงาน
Kutools สำหรับ Outlook - คุณสมบัติอันทรงพลังมากกว่า 100 รายการเพื่อเติมพลังให้กับ Outlook ของคุณ
🤖 ผู้ช่วยจดหมาย AI: ส่งอีเมลระดับมืออาชีพทันทีด้วยเวทมนตร์ AI คลิกเพียงครั้งเดียวเพื่อตอบกลับอย่างชาญฉลาด น้ำเสียงที่สมบูรณ์แบบ การเรียนรู้หลายภาษา เปลี่ยนรูปแบบการส่งอีเมลอย่างง่ายดาย! ...
📧 การทำงานอัตโนมัติของอีเมล: ไม่อยู่ที่สำนักงาน (ใช้ได้กับ POP และ IMAP) / กำหนดการส่งอีเมล / Auto CC/BCC ตามกฎเมื่อส่งอีเมล / ส่งต่ออัตโนมัติ (กฎขั้นสูง) / เพิ่มคำทักทายอัตโนมัติ / แบ่งอีเมลผู้รับหลายรายออกเป็นข้อความส่วนตัวโดยอัตโนมัติ ...
📨 การจัดการอีเมล์: เรียกคืนอีเมลได้อย่างง่ายดาย / บล็อกอีเมลหลอกลวงตามหัวเรื่องและอื่นๆ / ลบอีเมลที่ซ้ำกัน / การค้นหาขั้นสูง / รวมโฟลเดอร์ ...
📁 ไฟล์แนบโปร: บันทึกแบทช์ / การแยกแบทช์ / การบีบอัดแบบแบตช์ / บันทึกอัตโนมัติ / ถอดอัตโนมัติ / บีบอัดอัตโนมัติ ...
🌟 อินเตอร์เฟซเมจิก: 😊อีโมจิที่สวยและเจ๋งยิ่งขึ้น / เพิ่มประสิทธิภาพการทำงาน Outlook ของคุณด้วยมุมมองแบบแท็บ / ลดขนาด Outlook แทนที่จะปิด ...
???? เพียงคลิกเดียวสิ่งมหัศจรรย์: ตอบกลับทั้งหมดด้วยไฟล์แนบที่เข้ามา / อีเมลต่อต้านฟิชชิ่ง / 🕘 แสดงโซนเวลาของผู้ส่ง ...
👩🏼🤝👩🏻 รายชื่อและปฏิทิน: แบทช์เพิ่มผู้ติดต่อจากอีเมลที่เลือก / แบ่งกลุ่มผู้ติดต่อเป็นกลุ่มแต่ละกลุ่ม / ลบการแจ้งเตือนวันเกิด ...
เกิน คุณสมบัติ 100 รอการสำรวจของคุณ! คลิกที่นี่เพื่อค้นพบเพิ่มเติม

