ไปยังเนื้อหาหลัก

วิธีย้ายอีเมลไปยังโฟลเดอร์ใน Outlook โดยอัตโนมัติ

ตามค่าเริ่มต้น Outlook จะวางอีเมลที่ได้รับทั้งหมดไว้ในโฟลเดอร์กล่องขาเข้า คุณควรทำอย่างไรถ้ารู้สึกว่ากล่องขาเข้าของคุณรกและต้องการย้ายอีเมลบางฉบับไปยังโฟลเดอร์อื่นโดยอัตโนมัติ บทช่วยสอนนี้ช่วยให้คุณสร้างกฎใน Outlook เพื่อย้ายอีเมลไปยังโฟลเดอร์เฉพาะโดยอัตโนมัติ

ย้ายอีเมลไปยังโฟลเดอร์โดยอัตโนมัติโดยสร้างกฎใน Outlook


ลูกศรสีฟ้าฟองขวา ย้ายอีเมลไปยังโฟลเดอร์โดยอัตโนมัติโดยสร้างกฎใน Outlook

1. ขั้นแรก เลือกอีเมลที่คุณต้องการย้ายไปยังโฟลเดอร์ใดโฟลเดอร์หนึ่ง คลิกขวาบนอีเมล แล้วเลือก กฎระเบียบ > สร้างบัญชีตัวแทนกฎ…. ดูภาพหน้าจอ:

2 ใน สร้างกฎ ไดอะล็อกภายใต้ เมื่อฉันได้รับอีเมลพร้อมเงื่อนไขที่เลือกทั้งหมด ส่วนระบุเงื่อนไขสำหรับอีเมลนี้ (ที่นี่ฉันเลือกช่องเรื่องมีและหัวเรื่องของอีเมลที่เลือกจะถูกเพิ่มลงในกล่องข้อความโดยอัตโนมัติ) และต่ำกว่า ดำเนินการดังต่อไปนี้ ตรวจสอบ ย้ายรายการไปที่โฟลเดอร์ จากนั้นคลิกที่ไฟล์ เลือกโฟลเดอร์ ปุ่ม

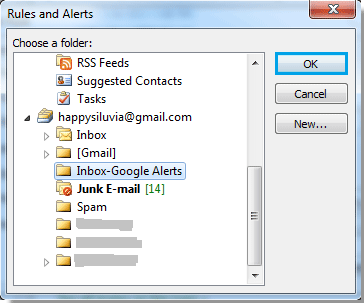
3 ใน กฎและการแจ้งเตือน กล่องโต้ตอบ เลือกโฟลเดอร์เพื่อบันทึกอีเมลที่ย้าย จากนั้นคลิก OK เพื่อปิดกล่องโต้ตอบ

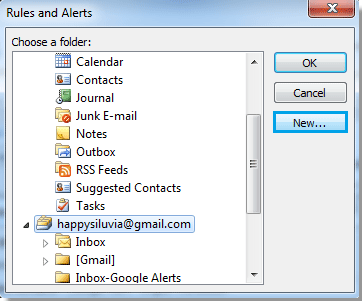
4. หากคุณต้องการสร้างโฟลเดอร์ใหม่สำหรับอีเมลเหล่านี้ ให้คลิกที่ ใหม่… เพื่อสร้างโฟลเดอร์ใหม่


ตัว Vortex Indicator ได้ถูกนำเสนอลงในนิตยสาร สร้างโฟลเดอร์ใหม่ โต้ตอบ Name โฟลเดอร์ เลือกโฟลเดอร์ที่จะวางโฟลเดอร์ใหม่ลงในโฟลเดอร์ เลือกตำแหน่งที่จะวางโฟลเดอร์ แล้วคลิก OK ปุ่ม

5. เมื่อมันกลับไปที่ สร้างกฎ คลิกตกลง OK เพื่อสิ้นสุดการตั้งค่าทั้งหมด

6. ตอนนี้ก ความสำเร็จ กล่องข้อความปรากฏขึ้นให้เลือก เรียกใช้กฎนี้กับข้อความที่อยู่ในโฟลเดอร์ปัจจุบันแล้ว จากนั้นคลิก OK เพื่อเริ่มการลบ

7. จากนี้ไปเมื่อ Outlook ได้รับอีเมลที่ตรงตามเงื่อนไข อีเมลนั้นจะถูกย้ายไปยังโฟลเดอร์เฉพาะโดยอัตโนมัติ


สุดยอดเครื่องมือเพิ่มผลผลิตในสำนักงาน

Kutools สำหรับ Outlook - คุณสมบัติอันทรงพลังมากกว่า 100 รายการเพื่อเติมพลังให้กับ Outlook ของคุณ

🤖 ผู้ช่วยจดหมาย AI: ส่งอีเมลระดับมืออาชีพทันทีด้วยเวทมนตร์ AI คลิกเพียงครั้งเดียวเพื่อตอบกลับอย่างชาญฉลาด น้ำเสียงที่สมบูรณ์แบบ การเรียนรู้หลายภาษา เปลี่ยนรูปแบบการส่งอีเมลอย่างง่ายดาย! ...

📧 การทำงานอัตโนมัติของอีเมล: ไม่อยู่ที่สำนักงาน (ใช้ได้กับ POP และ IMAP)  /  กำหนดการส่งอีเมล  /  Auto CC/BCC ตามกฎเมื่อส่งอีเมล  /  ส่งต่ออัตโนมัติ (กฎขั้นสูง)   /  เพิ่มคำทักทายอัตโนมัติ   /  แบ่งอีเมลผู้รับหลายรายออกเป็นข้อความส่วนตัวโดยอัตโนมัติ ...

📨 การจัดการอีเมล์: เรียกคืนอีเมลได้อย่างง่ายดาย  /  บล็อกอีเมลหลอกลวงตามหัวเรื่องและอื่นๆ  /  ลบอีเมลที่ซ้ำกัน  /  การค้นหาขั้นสูง  /  รวมโฟลเดอร์ ...

📁 ไฟล์แนบโปรบันทึกแบทช์  /  การแยกแบทช์  /  การบีบอัดแบบแบตช์  /  บันทึกอัตโนมัติ   /  ถอดอัตโนมัติ  /  บีบอัดอัตโนมัติ ...

🌟 อินเตอร์เฟซเมจิก: 😊อีโมจิที่สวยและเจ๋งยิ่งขึ้น   /  เพิ่มประสิทธิภาพการทำงาน Outlook ของคุณด้วยมุมมองแบบแท็บ  /  ลดขนาด Outlook แทนที่จะปิด ...

???? เพียงคลิกเดียวสิ่งมหัศจรรย์: ตอบกลับทั้งหมดด้วยไฟล์แนบที่เข้ามา  /   อีเมลต่อต้านฟิชชิ่ง  /  🕘 แสดงโซนเวลาของผู้ส่ง ...

👩🏼‍🤝‍👩🏻 รายชื่อและปฏิทิน: แบทช์เพิ่มผู้ติดต่อจากอีเมลที่เลือก  /  แบ่งกลุ่มผู้ติดต่อเป็นกลุ่มแต่ละกลุ่ม  /  ลบการแจ้งเตือนวันเกิด ...

เกิน คุณสมบัติ 100 รอการสำรวจของคุณ! คลิกที่นี่เพื่อค้นพบเพิ่มเติม


Comments (29)
Rated 4.5 out of 5 · 1 ratings
This comment was minimized by the moderator on the site
tres pratique
merci
ca fais des mois que je cherche comment faire !
Rated 4.5 out of 5
This comment was minimized by the moderator on the site
Hi lea,

I am glad to hear that. Thank you for your comment.
This comment was minimized by the moderator on the site
tres pratique
merci
ca fais des mois que je cherche comment faire
This comment was minimized by the moderator on the site
Hallo.. Mau tanya dong. Misalkan saya punya 2 akun login di outlook, contoh : &
Terkadang email untuk abc harusnya masuk ke akun abc tapi dia masuknya ke akun xyz, jadi saya harus pindahkan secara manual ke akun abc agar email nya pindah kesana. Apakah ada solusi agar email masuk sesuai akun masing2?
This comment was minimized by the moderator on the site
Hi Jay,
If you want to move emails to different folders based on different email accounts, you need to create different rules to accomplish it.
As you mentioned in the example, you need to create two rules.
In the Create Rule dialog box, after specifying the conditions and folder, click the Advanced Options button. Then check the through the specified account checkbox and then specify the account (such as ).
Repeat the steps to create another rule for the account .
See the attached screenshot:
This comment was minimized by the moderator on the site
Stay entertained now with the Mobdro app, which is the best free and online TV viewing application for 2020 for any device. To download and learn more cool features please visit: MobdroPlus.com
This comment was minimized by the moderator on the site
very helpful, thank you!
This comment was minimized by the moderator on the site
thanks team well done
This comment was minimized by the moderator on the site
I will now be saving up for anything for you
This comment was minimized by the moderator on the site
even now after hitting send I have no idea whether it went anywhere or not!
This comment was minimized by the moderator on the site
I had thought I was losing my mind. I knew I had received emails from lawyers and others yet when I went to finally look at them they were GONE! Been involved in a legal matter with 2 governments & now I don't have a leg to stand on. Only found out yesterday that the emails are deleted after 5 days!! Guess what? Because of my situation I do not have time to watch your videos, don't understand any of your tech talk and am utterly fedup!Thanks again Microsoft-I don't think you guys know what you're doing any more than I do! I can't even do a backup because now it doesn't recognize my external. Even bought another one-still doesn't recognize it. Yeah, I was one of your Vista victims-never could do a backup on that either. I will now be saving up for anything Apple!
This comment was minimized by the moderator on the site
It's Working. Thanks.
There are no comments posted here yet
Load More
Please leave your comments in English
Posting as Guest
×
Rate this post:
0   Characters
Suggested Locations