ไปยังเนื้อหาหลัก

วิธีสร้างรายการแบบหล่นลงพร้อมช่องทำเครื่องหมายหลายช่องใน Excel

ผู้ใช้ Excel จำนวนมากมักจะสร้างรายการแบบหล่นลงโดยมีช่องทำเครื่องหมายหลายช่องเพื่อเลือกหลายรายการจากรายการต่อครั้ง จริงๆแล้วคุณไม่สามารถสร้างรายการที่มีช่องทำเครื่องหมายหลายช่องด้วยการตรวจสอบข้อมูล ในบทช่วยสอนนี้เราจะแสดงวิธีการสองวิธีในการสร้างรายการแบบหล่นลงพร้อมช่องทำเครื่องหมายหลายช่องใน Excel

ใช้กล่องรายการเพื่อสร้างรายการแบบหล่นลงโดยมีช่องทำเครื่องหมายหลายช่อง
ตอบ: สร้างกล่องรายการที่มีแหล่งข้อมูล
B: ตั้งชื่อเซลล์ที่คุณจะค้นหารายการที่เลือก
C: แทรกรูปร่างเพื่อช่วยส่งออกรายการที่เลือก
สร้างรายการแบบหล่นลงได้อย่างง่ายดายด้วยช่องทำเครื่องหมายด้วยเครื่องมือที่น่าทึ่ง
บทแนะนำเพิ่มเติมสำหรับรายการแบบเลื่อนลง ...


ใช้กล่องรายการเพื่อสร้างรายการแบบหล่นลงโดยมีช่องทำเครื่องหมายหลายช่อง

ดังภาพด้านล่างที่แสดงในแผ่นงานปัจจุบันชื่อทั้งหมดในช่วง A2: A11 จะเป็นแหล่งข้อมูลของกล่องรายการ คลิกที่ปุ่มในเซลล์ C4 สามารถแสดงรายการที่เลือกและรายการที่เลือกทั้งหมดในกล่องรายการจะแสดงในเซลล์ E4 เพื่อให้บรรลุสิ่งนี้โปรดทำดังนี้

A. สร้างกล่องรายการที่มีแหล่งข้อมูล

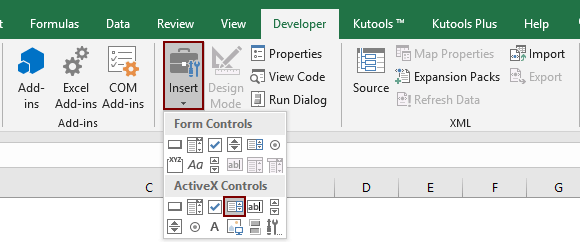
1 คลิก ผู้พัฒนา > สิ่งที่ใส่เข้าไป > กล่องรายการ (Active X Control). ดูภาพหน้าจอ:

2. วาดกล่องรายการในแผ่นงานปัจจุบันคลิกขวาแล้วเลือก อสังหาริมทรัพย์ จากเมนูคลิกขวา

3 ใน อสังหาริมทรัพย์ คุณต้องกำหนดค่าดังต่อไปนี้

  • 3.1 ใน รายการFillRange ป้อนช่วงต้นทางที่คุณจะแสดงในรายการ (ที่นี่ฉันป้อนช่วง A2: A11);
  • 3.2 ใน สไตล์รายการ เลือก 1 - ตัวเลือกสไตล์รายการ fmList;
  • 3.3 ใน เลือกหลายรายการ เลือก 1 - fmMultiSelectMulti;
  • 3.4 ปิดไฟล์ อสังหาริมทรัพย์ กล่องโต้ตอบ ดูภาพหน้าจอ:

B: ตั้งชื่อเซลล์ที่คุณจะค้นหารายการที่เลือก

หากคุณต้องการส่งออกรายการที่เลือกทั้งหมดลงในเซลล์ที่ระบุเช่น E4 โปรดทำดังนี้

1. เลือกเซลล์ E4 ป้อน ListBoxOutput เข้าไปใน ชื่อ: กล่อง และกดปุ่ม เข้าสู่ กุญแจ

C. แทรกรูปร่างเพื่อช่วยส่งออกรายการที่เลือก

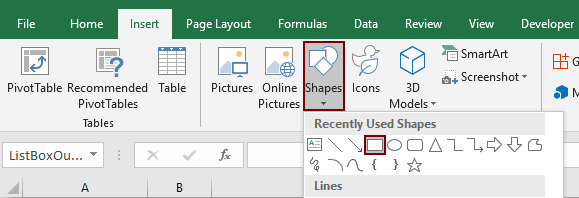
1 คลิก สิ่งที่ใส่เข้าไป > รูปร่าง > สี่เหลี่ยมผืนผ้า. ดูภาพหน้าจอ:

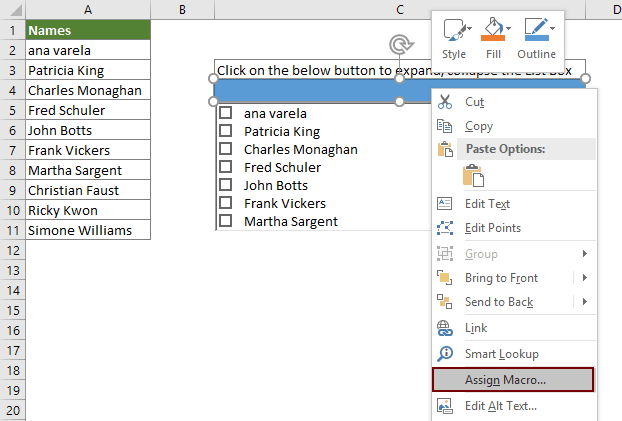
2. วาดรูปสี่เหลี่ยมผืนผ้าในแผ่นงานของคุณ (ที่นี่ฉันวาดรูปสี่เหลี่ยมผืนผ้าในเซลล์ C4) จากนั้นคลิกขวาที่สี่เหลี่ยมผืนผ้าแล้วเลือก กำหนดมาโคร จากเมนูคลิกขวา

3 ใน กำหนดมาโคร ใหคลิกปุ the ม ใหม่ ปุ่ม

4. ในการเปิด Microsoft Visual Basic สำหรับแอปพลิเคชัน โปรดแทนที่รหัสเดิมในไฟล์ โมดูล หน้าต่างที่มีรหัส VBA ด้านล่าง

รหัส VBA: สร้างรายการที่มีช่องทำเครื่องหมายหลายช่อง

Sub Rectangle1_Click()
'Updated by Extendoffice 20200730
Dim xSelShp As Shape, xSelLst As Variant, I, J As Integer
Dim xV As String
Set xSelShp = ActiveSheet.Shapes(Application.Caller)
Set xLstBox = ActiveSheet.ListBox1
If xLstBox.Visible = False Then
    xLstBox.Visible = True
    xSelShp.TextFrame2.TextRange.Characters.Text = "Pickup Options"
    xStr = ""
    xStr = Range("ListBoxOutput").Value
    
    If xStr <> "" Then
         xArr = Split(xStr, ";")
    For I = xLstBox.ListCount - 1 To 0 Step -1
        xV = xLstBox.List(I)
        For J = 0 To UBound(xArr)
            If xArr(J) = xV Then
              xLstBox.Selected(I) = True
              Exit For
            End If
        Next
    Next I
    End If
Else
    xLstBox.Visible = False
    xSelShp.TextFrame2.TextRange.Characters.Text = "Select Options"
    For I = xLstBox.ListCount - 1 To 0 Step -1
        If xLstBox.Selected(I) = True Then
        xSelLst = xLstBox.List(I) & ";" & xSelLst
        End If
    Next I
    If xSelLst <> "" Then
        Range("ListBoxOutput") = Mid(xSelLst, 1, Len(xSelLst) - 1)
    Else
        Range("ListBoxOutput") = ""
    End If
End If
End Sub

หมายเหตุ ในรหัส สี่เหลี่ยมผืนผ้า 1 คือชื่อรูปร่าง กล่องรายการ 1 คือชื่อของกล่องรายการ เลือกตัวเลือก และ ตัวเลือกการรับสินค้า เป็นข้อความที่แสดงของรูปร่าง และ ListBoxOutput คือชื่อช่วงของเซลล์ผลลัพธ์ คุณสามารถเปลี่ยนแปลงได้ตามความต้องการของคุณ

5 กด อื่น ๆ + Q พร้อมกันเพื่อปิดไฟล์ Microsoft Visual Basic สำหรับแอปพลิเคชัน หน้าต่าง

6. คลิกที่ปุ่มสี่เหลี่ยมผืนผ้าจะพับหรือขยายกล่องรายการ เมื่อกล่องรายการกำลังขยายให้ตรวจสอบรายการในกล่องรายการจากนั้นคลิกสี่เหลี่ยมอีกครั้งเพื่อส่งออกรายการที่เลือกทั้งหมดไปยังเซลล์ E4 ดูการสาธิตด้านล่าง:

7. จากนั้นบันทึกสมุดงานเป็นไฟล์ Excel Macro เปิดใช้งานสมุดงาน สำหรับการนำโค้ดกลับมาใช้ใหม่ในอนาคต


สร้างรายการแบบหล่นลงพร้อมช่องทำเครื่องหมายด้วยเครื่องมือที่น่าทึ่ง

วิธีการข้างต้นเป็นหลายขั้นตอนเกินไปที่จะจัดการได้อย่างง่ายดาย ที่นี่ขอแนะนำ รายการแบบหล่นลงพร้อมกล่องกาเครื่องหมาย ประโยชน์ของ Kutools สำหรับ Excel เพื่อช่วยให้คุณสร้างรายการแบบหล่นลงได้อย่างง่ายดายด้วยช่องทำเครื่องหมายในช่วงที่ระบุแผ่นงานปัจจุบันสมุดงานปัจจุบันหรือสมุดงานที่เปิดทั้งหมดตามความต้องการของคุณ ดูการสาธิตด้านล่าง:
ดาวน์โหลดและทดลองใช้ทันที! (เส้นทางฟรี 30 วัน)

นอกเหนือจากการสาธิตข้างต้นเรายังมีคำแนะนำทีละขั้นตอนเพื่อสาธิตวิธีการใช้คุณสมบัตินี้เพื่อให้บรรลุภารกิจนี้ กรุณาดำเนินการดังนี้

1. เปิดแผ่นงานที่คุณตั้งค่ารายการแบบเลื่อนลงการตรวจสอบข้อมูลคลิก Kutools > รายการแบบหล่นลง > รายการแบบหล่นลงพร้อมกล่องกาเครื่องหมาย > การตั้งค่า ดูภาพหน้าจอ:

2 ใน รายการแบบหล่นลงพร้อมการตั้งค่ากล่องกาเครื่องหมาย โปรดกำหนดค่าดังต่อไปนี้

  • 2.1) ใน ใช้กับ ระบุขอบเขตการใช้งานที่คุณจะสร้างช่องทำเครื่องหมายสำหรับรายการในรายการแบบเลื่อนลง คุณสามารถระบุไฟล์ บางช่วง, แผ่นงานปัจจุบัน, สมุดงานปัจจุบัน or สมุดงานที่เปิดไว้ทั้งหมด ขึ้นอยู่กับความต้องการของคุณ
  • 2.2) ใน โหมด เลือกสไตล์ที่คุณต้องการส่งออกรายการที่เลือก
  • ที่นี่ใช้เวลา แก้ไข เป็นตัวอย่างหากคุณเลือกสิ่งนี้ค่าของเซลล์จะเปลี่ยนไปตามรายการที่เลือก
  • 2.3) ใน เครื่องสกัด กล่องป้อนตัวคั่นที่คุณจะใช้เพื่อแยกหลายรายการ
  • 2.4) ใน ทิศทางข้อความ เลือกทิศทางข้อความตามความต้องการของคุณ
  • 2.5) คลิกปุ่ม OK ปุ่ม

3. ขั้นตอนสุดท้ายคลิก Kutools > รายการแบบหล่นลง > รายการแบบหล่นลงพร้อมกล่องกาเครื่องหมาย > เปิดใช้งานรายการดรอปดาวน์ของกล่องกาเครื่องหมาย เพื่อเปิดใช้งานคุณสมบัตินี้

จากนี้ไปเมื่อคุณคลิกเซลล์ที่มีรายการแบบหล่นลงในขอบเขตที่ระบุกล่องรายการจะปรากฏขึ้นโปรดเลือกรายการโดยทำเครื่องหมายที่ช่องเพื่อส่งออกไปยังเซลล์ดังตัวอย่างด้านล่างที่แสดง ).

สำหรับรายละเอียดเพิ่มเติมของคุณสมบัตินี้ กรุณาเยี่ยมชมที่นี่.

  หากคุณต้องการทดลองใช้ยูทิลิตีนี้ฟรี (30 วัน) กรุณาคลิกเพื่อดาวน์โหลดแล้วไปใช้การดำเนินการตามขั้นตอนข้างต้น


บทความที่เกี่ยวข้อง:

เติมข้อความอัตโนมัติเมื่อพิมพ์ในรายการแบบเลื่อนลงของ Excel
หากคุณมีรายการแบบเลื่อนลงการตรวจสอบข้อมูลที่มีค่ามากคุณจะต้องเลื่อนลงในรายการเพื่อค้นหาคำที่เหมาะสมหรือพิมพ์ทั้งคำลงในกล่องรายการโดยตรง หากมีวิธีการอนุญาตให้กรอกอัตโนมัติเมื่อพิมพ์ตัวอักษรตัวแรกในรายการแบบเลื่อนลงทุกอย่างจะง่ายขึ้น บทแนะนำนี้มีวิธีการแก้ปัญหา

สร้างรายการแบบหล่นลงจากสมุดงานอื่นใน Excel
มันค่อนข้างง่ายในการสร้างรายการแบบเลื่อนลงสำหรับการตรวจสอบข้อมูลระหว่างแผ่นงานภายในสมุดงาน แต่ถ้าข้อมูลรายการที่คุณต้องการสำหรับการตรวจสอบข้อมูลอยู่ในสมุดงานอื่นคุณจะทำอย่างไร? ในบทช่วยสอนนี้คุณจะได้เรียนรู้วิธีสร้างรายการลดลงจากสมุดงานอื่นใน Excel โดยละเอียด

สร้างรายการดรอปดาวน์ที่ค้นหาได้ใน Excel
สำหรับรายการแบบหล่นลงที่มีค่ามากมายการค้นหารายการที่เหมาะสมไม่ใช่เรื่องง่าย ก่อนหน้านี้เราได้แนะนำวิธีการกรอกรายการแบบเลื่อนลงโดยอัตโนมัติเมื่อป้อนตัวอักษรตัวแรกลงในช่องแบบเลื่อนลง นอกจากฟังก์ชันเติมข้อความอัตโนมัติแล้วคุณยังสามารถค้นหารายการแบบหล่นลงได้เพื่อเพิ่มประสิทธิภาพในการทำงานในการค้นหาค่าที่เหมาะสมในรายการแบบเลื่อนลง หากต้องการค้นหารายการแบบหล่นลงให้ลองใช้วิธีการในบทช่วยสอนนี้

เติมข้อมูลเซลล์อื่นโดยอัตโนมัติเมื่อเลือกค่าในรายการแบบเลื่อนลงของ Excel
สมมติว่าคุณได้สร้างรายการแบบหล่นลงตามค่าในช่วงเซลล์ B8: B14 เมื่อคุณเลือกค่าใด ๆ ในรายการแบบหล่นลงคุณต้องการให้ค่าที่เกี่ยวข้องในช่วงเซลล์ C8: C14 ถูกเติมโดยอัตโนมัติในเซลล์ที่เลือก สำหรับการแก้ปัญหาวิธีการในบทช่วยสอนนี้จะช่วยคุณได้

บทแนะนำเพิ่มเติมสำหรับรายการแบบเลื่อนลง ...

สุดยอดเครื่องมือเพิ่มผลผลิตในสำนักงาน

🤖 Kutools AI ผู้ช่วย: ปฏิวัติการวิเคราะห์ข้อมูลโดยยึดตาม: การดำเนินการที่ชาญฉลาด   |  สร้างรหัส  |  สร้างสูตรที่กำหนดเอง  |  วิเคราะห์ข้อมูลและสร้างแผนภูมิ  |  เรียกใช้ฟังก์ชัน Kutools...
คุณสมบัติยอดนิยม: ค้นหา เน้น หรือระบุรายการที่ซ้ำกัน   |  ลบแถวว่าง   |  รวมคอลัมน์หรือเซลล์โดยไม่สูญเสียข้อมูล   |   รอบโดยไม่มีสูตร ...
การค้นหาขั้นสูง: VLookup หลายเกณฑ์    VLookup หลายค่า  |   VLookup ข้ามหลายแผ่น   |   การค้นหาที่ไม่ชัดเจน ....
รายการแบบเลื่อนลงขั้นสูง: สร้างรายการแบบหล่นลงอย่างรวดเร็ว   |  รายการแบบหล่นลงขึ้นอยู่กับ   |  เลือกหลายรายการแบบหล่นลง ....
ผู้จัดการคอลัมน์: เพิ่มจำนวนคอลัมน์เฉพาะ  |  ย้ายคอลัมน์  |  สลับสถานะการมองเห็นของคอลัมน์ที่ซ่อนอยู่  |  เปรียบเทียบช่วงและคอลัมน์ ...
คุณสมบัติเด่น: กริดโฟกัส   |  มุมมองการออกแบบ   |   บาร์สูตรใหญ่    สมุดงานและตัวจัดการชีต   |  ห้องสมุดทรัพยากร (ข้อความอัตโนมัติ)   |  เลือกวันที่   |  รวมแผ่นงาน   |  เข้ารหัส/ถอดรหัสเซลล์    ส่งอีเมลตามรายการ   |  ซุปเปอร์ฟิลเตอร์   |   ตัวกรองพิเศษ (กรองตัวหนา/ตัวเอียง/ขีดทับ...) ...
ชุดเครื่องมือ 15 อันดับแรก12 ข้อความ เครื่องมือ (เพิ่มข้อความ, ลบอักขระ, ... )   |   50 + แผนภูมิ ประเภท (แผนภูมิ Gantt, ... )   |   40+ ใช้งานได้จริง สูตร (คำนวณอายุตามวันเกิด, ... )   |   19 การแทรก เครื่องมือ (ใส่ QR Code, แทรกรูปภาพจากเส้นทาง, ... )   |   12 การแปลง เครื่องมือ (ตัวเลขเป็นคำ, การแปลงสกุลเงิน, ... )   |   7 ผสานและแยก เครื่องมือ (แถวรวมขั้นสูง, แยกเซลล์, ... )   |   ... และอื่น ๆ

เพิ่มพูนทักษะ Excel ของคุณด้วย Kutools สำหรับ Excel และสัมผัสประสิทธิภาพอย่างที่ไม่เคยมีมาก่อน Kutools สำหรับ Excel เสนอคุณสมบัติขั้นสูงมากกว่า 300 รายการเพื่อเพิ่มประสิทธิภาพและประหยัดเวลา  คลิกที่นี่เพื่อรับคุณสมบัติที่คุณต้องการมากที่สุด...

รายละเอียด


แท็บ Office นำอินเทอร์เฟซแบบแท็บมาที่ Office และทำให้งานของคุณง่ายขึ้นมาก

  • เปิดใช้งานการแก้ไขและอ่านแบบแท็บใน Word, Excel, PowerPoint, ผู้จัดพิมพ์, Access, Visio และโครงการ
  • เปิดและสร้างเอกสารหลายรายการในแท็บใหม่ของหน้าต่างเดียวกันแทนที่จะเป็นในหน้าต่างใหม่
  • เพิ่มประสิทธิภาพการทำงานของคุณ 50% และลดการคลิกเมาส์หลายร้อยครั้งให้คุณทุกวัน!
Comments (70)
No ratings yet. Be the first to rate!
This comment was minimized by the moderator on the site
Hello-

This is fabulous, but I was wondering if there is a way to call the code as a subroutine, ie Click Button 1, run this code with X List Box and X Output cell. I want to pass the listbox and the output cell as variables into this code. Any help would be greatly appreciated.

I've tried this:
Private Sub Rectangle1_Click()
Call MultiSelctDropdown(ListBox1,Output1)
End Sub

Private Sub Rectangle2_Click()
Call MultiSelctDropdown(ListBox2,Output2)
End Sub

Private Sub MultiSelectDropdown(ListBox As String, Output As String)
Dim xSelShp As Shape, xSelLst As Variant, I, J As Integer
Dim xV As String
Set xSelShp = ActiveSheet.Shapes(Application.Caller)
Set xLstBox = ActiveSheet.ListBox
If xLstBox.Visible = False Then
xLstBox.Visible = True
xSelShp.TextFrame2.TextRange.Characters.Text = "Enter"
xStr = ""
xStr = Range("Output").Value

If xStr <> "" Then
xArr = Split(xStr, ",")
For I = xLstBox.ListCount - 1 To 0 Step -1
xV = xLstBox.List(I)
For J = 0 To UBound(xArr)
If xArr(J) = xV Then
xLstBox.Selected(I) = True
Exit For
End If
Next
Next I
End If
Else
xLstBox.Visible = False
xSelShp.TextFrame2.TextRange.Characters.Text = "Click Here to Select Products"
For I = xLstBox.ListCount - 1 To 0 Step -1
If xLstBox.Selected(I) = True Then
xSelLst = xLstBox.List(I) & "," & xSelLst
End If
Next I
If xSelLst <> "" Then
Range("Output") = Mid(xSelLst, 1, Len(xSelLst) - 1)
Else
Range("Output") = ""
End If
End If
End Sub
This comment was minimized by the moderator on the site
Ok I figured this one out (see below)

But now I want to have only ONE list box that I can use over and over again with different buttons but different output depending on the button pushed. And the code below works for this EXCEPT the items selected when the list box pops up includes all items that have been outputted from the code.

If list box1 contains

Apples
Oranges
Pears
Kiwi

and button 1 is pressed and Apples is selected, when button 2 is pressed Apples is already selected, and if during button press 2 pears is selected when you go back to button 1 Apples AND Pears are selected.

How can I either clear all selected when a button is pressed OR make the selected options equal to the output.


Private Sub Button1_Click()
Call ProductSelection(ActiveSheet.ListBox1, "Button1Output", 243, 215)
End Sub
Private Sub Button2_Click()
Call ProductSelection(ActiveSheet.ListBox1, "Button2Output", 472, 215)
End Sub


Private Sub ProductSelection(xListBox As Object, Output As String, left As Integer, height As Integer)
Dim xSelShp As Shape, xSelLst As Variant, I, J As Integer
Dim xV As String
Set xSelShp = ActiveSheet.Shapes(Application.Caller)
Set xLstBox = xListBox
If xLstBox.Visible = False Then
xLstBox.Visible = True
xLstBox.left = left
xLstBox.height = height
xSelShp.TextFrame2.TextRange.Characters.Text = "Enter"
xStr = ""
xStr = Range(Output).Value

If xStr <> "" Then
xArr = Split(xStr, ",")
For I = xLstBox.ListCount - 1 To 0 Step -1
xV = xLstBox.List(I)
For J = 0 To UBound(xArr)
If xArr(J) = xV Then
xLstBox.Selected(I) = True
Exit For
End If
Next
Next I
End If
Else
xLstBox.Visible = False
xSelShp.TextFrame2.TextRange.Characters.Text = "Click Here to Select Products"
For I = xLstBox.ListCount - 1 To 0 Step -1
If xLstBox.Selected(I) = True Then
xSelLst = xLstBox.List(I) & "," & xSelLst
End If
Next I
If xSelLst <> "" Then
Range(Output) = Mid(xSelLst, 1, Len(xSelLst) - 1)
Else
Range(Output) = ""
End If
End If
End Sub
This comment was minimized by the moderator on the site
Hi there- this is super helpful, thank you! Can you tell me how I can draw a list box based on a list in a different worksheet (but same file)? I've tried entering my worksheet name (i.e., 'lists') followed by the range in the list fill range (after clicking on Properties) but this does not work.Thanks!
This comment was minimized by the moderator on the site
Hi Meghan,Supposing you want to <span style="letter-spacing: 0.2px; color: inherit; font-family: inherit; font-style: inherit; font-variant-ligatures: inherit; font-variant-caps: inherit;">ListBox1</span><span style="letter-spacing: 0.2px; color: inherit; font-family: inherit; font-style: inherit; font-variant-ligatures: inherit; font-variant-caps: inherit;">Sheet1</span><div data-tag="code">Sub listboxlistfillrangefromdifferentsheet()
Sheet1.ListBox1.ListFillRange = Sheet2.Range("A2:A20").Address(, , , True)
End Sub
This comment was minimized by the moderator on the site
hello, I have a problem with the list box: to make the list going down, I have to click on the box that allows the list to go down but when I click, it does not go down automatically, I have to click outside the list so that it refreshes and the list goes down, what to do? Thank you
This comment was minimized by the moderator on the site
Hi,You can't scroll ActiveX Listbox by mouse wheel. There is no setting for it.

This comment was minimized by the moderator on the site
Hi, thank you for sharing this! I have a question though, is it possible to populate different cells based on the selected option?For example, instead of having everything in one cell, each selection is populated in the cell below the earlier selection. Thank you!
This comment was minimized by the moderator on the site
Hi faez,
The VBA below helps to populate the selected options in different cells on the same row. Please have a try.

Sub Rectangle2_Click()
'Updated by Extendoffice 20211124
Dim xSelShp As Shape, xSelLst As Variant, I As Integer
Dim xRg As Range
Set xSelShp = ActiveSheet.Shapes(Application.Caller)
Set xLstBox = ActiveSheet.ListBox1
If xLstBox.Visible = False Then
xLstBox.Visible = True
xSelShp.TextFrame2.TextRange.Characters.Text = "Pickup Options"
Else
xLstBox.Visible = False
xSelShp.TextFrame2.TextRange.Characters.Text = "Select Options"
Set xRg = Range("ListBoxOutput")
For I = 0 To xLstBox.ListCount - 1
If xLstBox.Selected(I) = True Then
xSelLst = xLstBox.List(I)
xRg.Value = Mid(xSelLst, 1, Len(xSelLst))
Set xRg = xRg.Offset(0, 1)
End If
Next I
End If
End Sub
This comment was minimized by the moderator on the site
Hi Crystal,
Thanks a lot for this code, very helpful and convenient. One question : how to adpat it in order not to have the separator ";" if only one item is selected ?
This comment was minimized by the moderator on the site
Hi Eloi,No separator is displayed when you select only one item in the list.
This comment was minimized by the moderator on the site
Thanks Crystal, the mistake was in my adaptation of the code.
If someone needs to adapt it with a click on a cell instead of a click on a shape, you could try this (with a call to this sub in your sheet, with a condition when your cell is selected)

Sub affichage_liste(xLstBox As MSForms.ListBox, texte1 As String)
'Updated by Extendoffice 20200730
Dim xSelLst As Variant, I, J As Integer
Dim xV As String

If xLstBox.Visible = False Then
xLstBox.Visible = True
xStr = ""
xStr = Range(texte1).Value

If xStr <> "" Then
xArr = Split(xStr, ";")
For I = xLstBox.ListCount - 1 To 0 Step -1
xV = xLstBox.List(I)
For J = 0 To UBound(xArr)
If xArr(J) = xV Then
xLstBox.Selected(I) = True
Exit For
End If
Next
Next I
End If
Else
xLstBox.Visible = False
For I = xLstBox.ListCount - 1 To 0 Step -1
If xLstBox.Selected(I) = True Then
xSelLst = xLstBox.List(I) & "; " & xSelLst
End If
Next I
If xSelLst <> "" Then
Range(texte1) = Mid(xSelLst, 1, Len(xSelLst) - 2)
Else
Range(texte1) = ""
End If
End If
End Sub
This comment was minimized by the moderator on the site
Hi Eloi,The code you provided doesn't seem to work. I have modified it again as below.  After adding the code in your Sheet(Code) window, go back to the worksheet, click the cell C4 to expand the list box, after selecting items from the list box, click on any cell in the worksheet to output the selection, and no separator is displayed when you select only one item in the list.
<div data-tag="code">Private Sub Worksheet_SelectionChange(ByVal Target As Range)
'Updated by Extendoffice 20211223
Dim xSelLst As Variant, I, J As Integer
Dim xV As String
Set xLstBox = ActiveSheet.ListBox1

If Target.Address = "$C$4" Then


If xLstBox.Visible = False Then
xLstBox.Visible = True
xStr = ""
xStr = Range("ListBoxOutput").Value

If xStr <> "" Then
xArr = Split(xStr, ";")
For I = xLstBox.ListCount - 1 To 0 Step -1
xV = xLstBox.List(I)
For J = 0 To UBound(xArr)
If xArr(J) = xV Then
xLstBox.Selected(I) = True
Exit For
End If
Next
Next I
End If

End If

Else
xLstBox.Visible = False

For I = xLstBox.ListCount - 1 To 0 Step -1
If xLstBox.Selected(I) = True Then
xSelLst = xLstBox.List(I) & "; " & xSelLst
End If
Next I
If xSelLst <> "" Then
Range("ListBoxOutput") = Mid(xSelLst, 1, Len(xSelLst) - 2)
Else
Range("ListBoxOutput") = ""
End If


End If

End Sub
This comment was minimized by the moderator on the site
Thanks a lot Crystal
This comment was minimized by the moderator on the site
Bonjour,Je suis plus que novice sur excel étant sur mac je ne peux utiliser l'outil Kutools j'ai donc tenté de créer une liste déroulante où l'on peut cocher plusieurs items mais je bloque dès le début dans l'onglet développeur puisque je n'ai pas du tout l'outil "insert".Merci pour votre aide
This comment was minimized by the moderator on the site
Hi I am newbie to VBA. I tried to execute the code but i get the following error "Run-time error '-2147024809 (80070057)': The Item with the specified name wasn't found". Can you help me with this
This comment was minimized by the moderator on the site
Hi Gowtham,It seem that this error occurs when you running the code directly in the Code editor (the Microsoft Visual Basic for Applications window).After adding the code, please press the Alt + Q keys to close the Microsoft Visual Basic for Applications window. Go back to the worksheet and execute the code by clicking the rectangle button (see the .gif picture in step 6).
This comment was minimized by the moderator on the site
Hi Crystal, even after your tip am getting same error as Gowtham. My error is right after protect my sheet. Would you please help me with this issue?
This comment was minimized by the moderator on the site
Hi Crystal, Even After your tip I am getting same error as Gowtham.
This comment was minimized by the moderator on the site
Hi Mina,Which Excel and Windows version are you using?
This comment was minimized by the moderator on the site
Hello,I added this code to an existing macro template and it is loading the selections correctly, but it is NOT clearing out the x on the selected items..This will be used on/in a template worksheet that has submit button/macro to load the worksheet answers into a hidden worksheet with a data table.And am happy to say the field data loaded to the cell, transferred into my variable, and loaded to the data table as expected.
This code was a HUGE blessing!
I use excel 2016
How do I fix this. I am using this version from below.
Sub Rectangle1_Click()
'Updated by Extendoffice 20200730
Dim xSelShp As Shape, xSelLst As Variant, I, J As Integer
Dim xV As String
Set xSelShp = ActiveSheet.Shapes(Application.Caller)
Set xLstBox = ActiveSheet.ListBox1
If xLstBox.Visible = False Then
xLstBox.Visible = True
xSelShp.TextFrame2.TextRange.Characters.Text = "Pickup Options"
xStr = ""
xStr = Range("ListBoxOutput").Value

If xStr <> "" Then
xArr = Split(xStr, ";")
For I = xLstBox.ListCount - 1 To 0 Step -1
xV = xLstBox.List(I)
For J = 0 To UBound(xArr)
If xArr(J) = xV Then
xLstBox.Selected(I) = True
Exit For
End If
Next
Next I
End If
Else
xLstBox.Visible = False
xSelShp.TextFrame2.TextRange.Characters.Text = "Select Options"
For I = xLstBox.ListCount - 1 To 0 Step -1
If xLstBox.Selected(I) = True Then
xSelLst = xLstBox.List(I) & ";" & xSelLst
End If
Next I
If xSelLst <> "" Then
Range("ListBoxOutput") = Mid(xSelLst, 1, Len(xSelLst) - 1)
Else
Range("ListBoxOutput") = ""
End If
End If
End Sub
This comment was minimized by the moderator on the site
Hello,

I'm having a similar problem to Tom from 2 months ago. When I try to share my file with a colleague, the multi-select droplist list isn't working. However, I used the Kutools add-on to create this as opposed to creating it myself. I've also saved it as macro-enabled.
This comment was minimized by the moderator on the site
Hi ben,The multi-select drop down list feature of Kutools only works in the Excel that installed our Kutools. We are working on this issue, sorry for the inconvenience.
This comment was minimized by the moderator on the site
Hello I looking the resolve for problem with saving choosing on drop down list

when i choose something on list and send file to my colleague, then when he open file and want to check my list then list has cleared and cell "ListBoxOutput" was cleared too.

help please :)
This comment was minimized by the moderator on the site
Hi Tom,
Please save the workbook as an "Excel MacroEnable Workbook" and then send this .xlsm file to your colleague.
This comment was minimized by the moderator on the site
hello i save this file in this format from beginning ;), but without effect. still when i fill file and send to someone then when he opened file and click to "shape" then macro started from begin and cleared list
This comment was minimized by the moderator on the site
Hi Tom,
I am sorry for the mistake. The code has been updated again. Please have a try.

Sub Rectangle1_Click()

'Updated by Extendoffice 20200730

Dim xSelShp As Shape, xSelLst As Variant, I, J As Integer

Dim xV As String

Set xSelShp = ActiveSheet.Shapes(Application.Caller)

Set xLstBox = ActiveSheet.ListBox1

If xLstBox.Visible = False Then

xLstBox.Visible = True

xSelShp.TextFrame2.TextRange.Characters.Text = "Pickup Options"

xStr = ""

xStr = Range("ListBoxOutput").Value


If xStr <> "" Then

xArr = Split(xStr, ";")

For I = xLstBox.ListCount - 1 To 0 Step -1

xV = xLstBox.List(I)

For J = 0 To UBound(xArr)

If xArr(J) = xV Then

xLstBox.Selected(I) = True

Exit For

End If

Next

Next I

End If

Else

xLstBox.Visible = False

xSelShp.TextFrame2.TextRange.Characters.Text = "Select Options"

For I = xLstBox.ListCount - 1 To 0 Step -1

If xLstBox.Selected(I) = True Then

xSelLst = xLstBox.List(I) & ";" & xSelLst

End If

Next I

If xSelLst <> "" Then

Range("ListBoxOutput") = Mid(xSelLst, 1, Len(xSelLst) - 1)

Else

Range("ListBoxOutput") = ""

End If

End If

End Sub
This comment was minimized by the moderator on the site
Now it's working perfectly.

Many thanks for your help
There are no comments posted here yet
Load More
Please leave your comments in English
Posting as Guest
×
Rate this post:
0   Characters
Suggested Locations