วิธีสร้างปฏิทินใน Excel
ปฏิทิน Excel ช่วยให้คุณติดตามเหตุการณ์สำคัญ เช่น เมื่อมีคนเริ่มงานใหม่ หรือเมื่อจำเป็นต้องส่งมอบบางสิ่ง ทำให้การดูวันที่เหล่านี้ง่ายและชัดเจน ในคู่มือนี้ ฉันจะแสดงวิธีสร้างปฏิทินทั้งรายเดือนและรายปีใน Excel เราจะดูที่การใช้เทมเพลตเพื่อการตั้งค่าอย่างรวดเร็ว และวิธีสร้างเทมเพลตตั้งแต่ต้นสำหรับผู้ที่ต้องการการควบคุมที่มากขึ้น ด้วยวิธีนี้ คุณสามารถจัดระเบียบได้ ไม่ว่าจะเป็นเรื่องงานหรือแผนส่วนตัว

สร้างปฏิทินรายปีโดยใช้เทมเพลตปฏิทิน Excel
สร้างปฏิทินรายเดือนหรือรายปีอย่างรวดเร็วด้วย Kutools for Excel
สร้างปฏิทินรายปีโดยใช้เทมเพลตปฏิทิน Excel

ด้วยวิธีนี้คุณต้องมั่นใจว่าคอมพิวเตอร์ของคุณเชื่อมต่อกับเครือข่ายเพื่อให้คุณสามารถดาวน์โหลดไฟล์ เทมเพลตปฏิทิน.
1 ไปที่ เนื้อไม่มีมัน คลิกแท็บ ใหม่ บนบานหน้าต่างด้านซ้าย แล้วคลิก ปฏิทิน ราคาเริ่มต้นที่ การค้นหาที่แนะนำ. ดูภาพหน้าจอ:

2. เลือกหนึ่งในเทมเพลตปฏิทินที่คุณต้องการ ดับเบิลคลิกเพื่อสร้างปฏิทินรายปี

ผล
สร้างปฏิทินรายเดือนหรือรายปีอย่างรวดเร็วด้วย Kutools for Excel
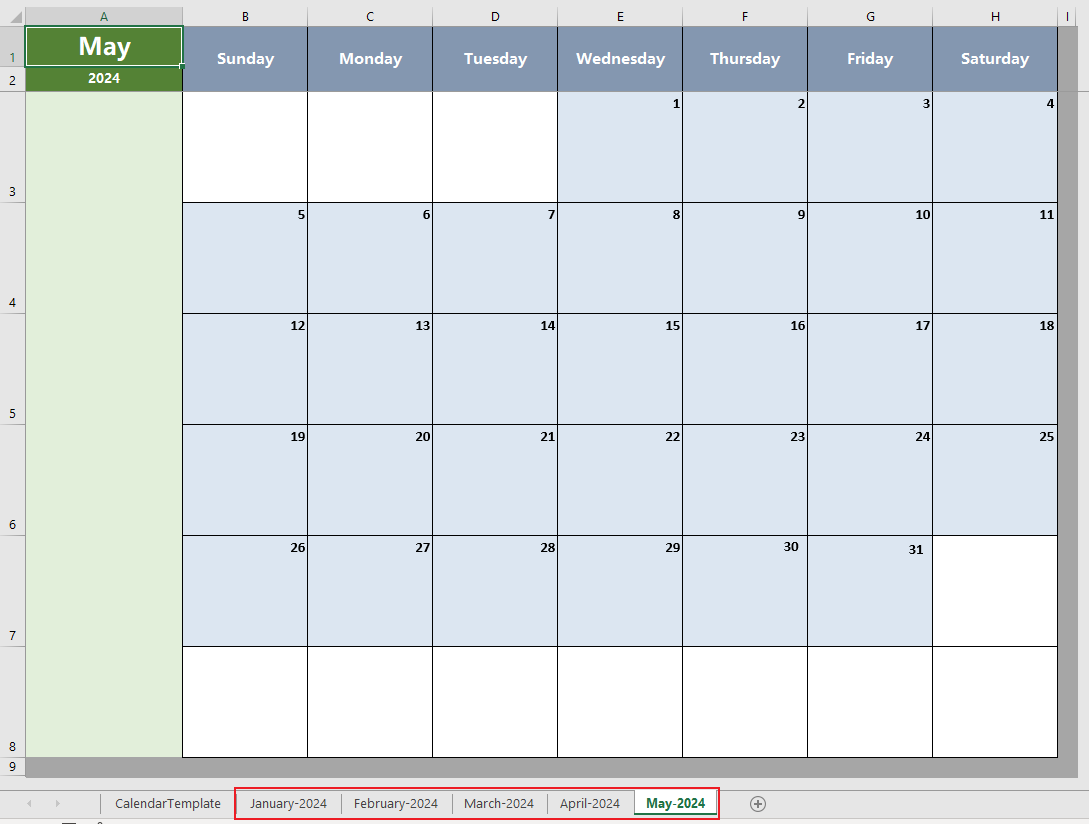
ปฏิทินตลอดไป เครื่องมือของ kutools สำหรับ Excel สามารถสร้างปฏิทินเดือนหรือปฏิทินปีที่กำหนดเองในสมุดงานใหม่ได้อย่างรวดเร็วและปฏิทินแต่ละเดือนจะรวมอยู่ในแผ่นงานใหม่
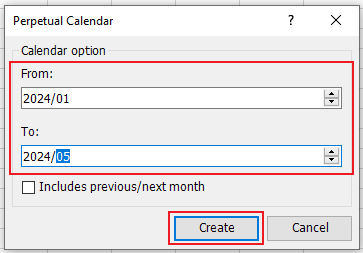
หลังจากติดตั้ง Kutools for Excel แล้วโปรดคลิก Kutools พลัส > แผ่นงาน > ปฏิทินตลอดไป. ในป๊อปอัป ปฏิทินตลอดไป โปรดทำดังนี้:
- หากต้องการสร้างปฏิทินรายเดือน ให้ระบุเดือนที่คุณต้องการสร้างปฏิทินผ่าน จาก และ ไปยัง รายการแบบเลื่อนลงแล้วคลิก สร้างบัญชีตัวแทน.
- หากต้องการสร้างปฏิทินรายปี ให้ระบุปีที่คุณต้องการสร้างปฏิทินผ่าน จาก และ ไปยัง รายการแบบเลื่อนลงแล้วคลิก สร้างบัญชีตัวแทน.

ผล
- ปฏิทินรายเดือน:
- ปฏิทินประจำปี:

สร้างปฏิทินรายเดือนด้วยรหัส VBA
ด้วยรหัส VBA ต่อไปนี้คุณสามารถสร้างปฏิทินรายเดือนได้อย่างรวดเร็ว กรุณาดำเนินการดังต่อไปนี้:
1. กด อื่น ๆ + F11 ปุ่มเพื่อเปิดหน้าต่าง Microsoft Visual Basic for Applications
2. จะมีหน้าต่างใหม่ปรากฏขึ้น คลิก สิ่งที่ใส่เข้าไป > โมดูลจากนั้นป้อนรหัสต่อไปนี้ในโมดูล:
 Sub CalendarMaker()
ActiveSheet.Protect DrawingObjects:=False, Contents:=False, _
Scenarios:=False
Application.ScreenUpdating = False
On Error GoTo MyErrorTrap
Range("a1:g14").Clear
MyInput = InputBox("Type in Month and year for Calendar ")
If MyInput = "" Then Exit Sub
StartDay = DateValue(MyInput)
If Day(StartDay) <> 1 Then
StartDay = DateValue(Month(StartDay) & "/1/" & _
Year(StartDay))
End If
Range("a1").NumberFormat = "mmmm yyyy"
With Range("a1:g1")
.HorizontalAlignment = xlCenterAcrossSelection
.VerticalAlignment = xlCenter
.Font.Size = 18
.Font.Bold = True
.RowHeight = 35
End With
With Range("a2:g2")
.ColumnWidth = 11
.VerticalAlignment = xlCenter
.HorizontalAlignment = xlCenter
.VerticalAlignment = xlCenter
.Orientation = xlHorizontal
.Font.Size = 12
.Font.Bold = True
.RowHeight = 20
End With
Range("a2") = "Sunday"
Range("b2") = "Monday"
Range("c2") = "Tuesday"
Range("d2") = "Wednesday"
Range("e2") = "Thursday"
Range("f2") = "Friday"
Range("g2") = "Saturday"
With Range("a3:g8")
.HorizontalAlignment = xlRight
.VerticalAlignment = xlTop
.Font.Size = 18
.Font.Bold = True
.RowHeight = 21
End With
Range("a1").Value = Application.Text(MyInput, "mmmm yyyy")
DayofWeek = Weekday(StartDay)
CurYear = Year(StartDay)
CurMonth = Month(StartDay)
FinalDay = DateSerial(CurYear, CurMonth + 1, 1)
Select Case DayofWeek
Case 1
Range("a3").Value = 1
Case 2
Range("b3").Value = 1
Case 3
Range("c3").Value = 1
Case 4
Range("d3").Value = 1
Case 5
Range("e3").Value = 1
Case 6
Range("f3").Value = 1
Case 7
Range("g3").Value = 1
End Select
For Each cell In Range("a3:g8")
RowCell = cell.Row
ColCell = cell.Column
If cell.Column = 1 And cell.Row = 3 Then
ElseIf cell.Column <> 1 Then
If cell.Offset(0, -1).Value >= 1 Then
cell.Value = cell.Offset(0, -1).Value + 1
If cell.Value > (FinalDay - StartDay) Then
cell.Value = ""
Exit For
End If
End If
ElseIf cell.Row > 3 And cell.Column = 1 Then
cell.Value = cell.Offset(-1, 6).Value + 1
If cell.Value > (FinalDay - StartDay) Then
cell.Value = ""
Exit For
End If
End If
Next
For x = 0 To 5
Range("A4").Offset(x * 2, 0).EntireRow.Insert
With Range("A4:G4").Offset(x * 2, 0)
.RowHeight = 65
.HorizontalAlignment = xlCenter
.VerticalAlignment = xlTop
.WrapText = True
.Font.Size = 10
.Font.Bold = False
.Locked = False
End With
With Range("A3").Offset(x * 2, 0).Resize(2, _
7).Borders(xlLeft)
.Weight = xlThick
.ColorIndex = xlAutomatic
End With
With Range("A3").Offset(x * 2, 0).Resize(2, _
7).Borders(xlRight)
.Weight = xlThick
.ColorIndex = xlAutomatic
End With
Range("A3").Offset(x * 2, 0).Resize(2, 7).BorderAround _
Weight:=xlThick, ColorIndex:=xlAutomatic
Next
If Range("A13").Value = "" Then Range("A13").Offset(0, 0) _
.Resize(2, 8).EntireRow.Delete
ActiveWindow.DisplayGridlines = False
ActiveSheet.Protect DrawingObjects:=True, Contents:=True, _
Scenarios:=True
ActiveWindow.WindowState = xlMaximized
ActiveWindow.ScrollRow = 1
Application.ScreenUpdating = True
Exit Sub
MyErrorTrap:
MsgBox "You may not have entered your Month and Year correctly." _
& Chr(13) & "Spell the Month correctly" _
& " (or use 3 letter abbreviation)" _
& Chr(13) & "and 4 digits for the Year"
MyInput = InputBox("Type in Month and year for Calendar")
If MyInput = "" Then Exit Sub
Resume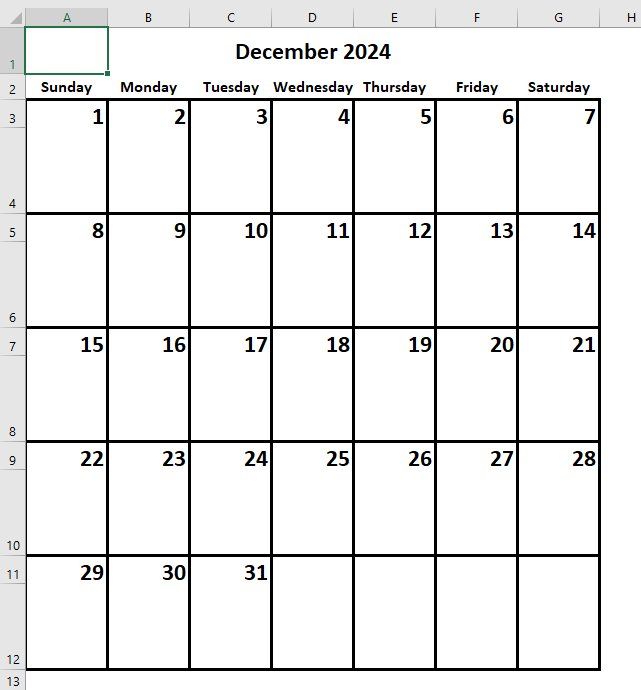
End Sub 3. จากนั้นคลิก วิ่ง หรือกด F5 กุญแจสำคัญในการเรียกใช้แอปพลิเคชัน ตอนนี้กล่องข้อความจะปรากฏขึ้น คุณสามารถป้อนเดือนและปีลงในช่องว่างได้

ผล
บทความที่เกี่ยวข้อง
วิธีสร้างปฏิทินรายการแบบหล่นลง (ตัวเลือกวันที่) ใน Excel
ด้วยปฏิทินแบบเลื่อนลงในแผ่นงาน Excel คุณสามารถเลือกวันที่ที่ต้องการได้อย่างง่ายดายโดยไม่ต้องพิมพ์ด้วยตนเอง บทช่วยสอนนี้แสดงวิธีสร้างปฏิทินในแผ่นงาน Excel โดยใช้ ActiveX Control
จะแสดงปฏิทินเมื่อคลิกเซลล์ใดเซลล์หนึ่งใน Excel ได้อย่างไร?
บทความนี้พูดถึงการป็อปอัพปฏิทินเมื่อคลิกที่เซลล์ในช่วงที่กำหนด จากนั้นจะแทรกวันที่ลงในเซลล์ที่เลือกโดยอัตโนมัติหลังจากเลือกวันที่ในปฏิทิน
วิธีสร้างการนัดหมายจากแผ่นงาน Excel ไปยังปฏิทิน Outlook
ในบางครั้ง, คุณอาจต้องสร้างการนัดหมายในปฏิทิน Outlook แต่คุณเคยพยายามแสดงรายการการนัดหมายในแผ่นงาน Excel แล้วนำเข้าปฏิทิน Outlook ตามภาพด้านล่างที่แสดงหรือไม่?
วิธีสร้างปฏิทินรายเดือนแบบไดนามิกใน Excel
บทความนี้จะแสดงวิธีการสร้างปฏิทินรายเดือนแบบไดนามิกใน Excel โดยละเอียด
เครื่องมือเพิ่มประสิทธิภาพการทำงานในสำนักงานที่ดีที่สุด
Kutools สำหรับ Excel - ช่วยให้คุณโดดเด่นจากฝูงชน
Kutools สำหรับ Excel มีคุณสมบัติมากกว่า 300 รายการ รับรองว่าสิ่งที่คุณต้องการเพียงแค่คลิกเดียว...
")
แท็บ Office - เปิดใช้งานการอ่านแบบแท็บและการแก้ไขใน Microsoft Office (รวม Excel)
- หนึ่งวินาทีเพื่อสลับไปมาระหว่างเอกสารที่เปิดอยู่มากมาย!
- ลดการคลิกเมาส์หลายร้อยครั้งสำหรับคุณทุกวันบอกลามือเมาส์
- เพิ่มประสิทธิภาพการทำงานของคุณได้ถึง 50% เมื่อดูและแก้ไขเอกสารหลายฉบับ
- นำแท็บที่มีประสิทธิภาพมาสู่ Office (รวมถึง Excel) เช่นเดียวกับ Chrome, Edge และ Firefox
")