ไปยังเนื้อหาหลัก

วิธีแทรกแถวใหม่ว่างโดยอัตโนมัติโดยปุ่มคำสั่งใน Excel

ในหลาย ๆ กรณีคุณอาจต้องแทรกแถวใหม่ว่างลงในตำแหน่งที่ระบุของแผ่นงานของคุณ ในบทความนี้เราจะแสดงวิธีแทรกแถวใหม่ที่ว่างโดยอัตโนมัติโดยคลิกที่ปุ่มคำสั่งใน Excel

แทรกแถวใหม่ที่ว่างโดยอัตโนมัติโดยปุ่มคำสั่ง


แทรกแถวใหม่ที่ว่างโดยอัตโนมัติโดยปุ่มคำสั่ง

คุณสามารถเรียกใช้รหัส VBA ต่อไปนี้เพื่อแทรกแถวใหม่ว่างโดยคลิกปุ่มคำสั่ง กรุณาดำเนินการดังนี้

1. ประการแรกคุณต้องแทรกปุ่มคำสั่ง กรุณาคลิก ผู้พัฒนา > สิ่งที่ใส่เข้าไป > ปุ่มคำสั่ง (ActiveX Control). ดูภาพหน้าจอ:

2. จากนั้นวาดปุ่มคำสั่งในแผ่นงานที่คุณต้องการเพิ่มแถวใหม่คลิกขวาที่ปุ่มคำสั่งแล้วคลิก อสังหาริมทรัพย์ จากเมนูคลิกขวา

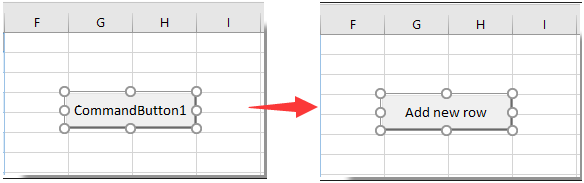
3 ใน อสังหาริมทรัพย์ ให้ป้อนข้อความที่แสดงของปุ่มคำสั่งลงในไฟล์ คำบรรยายภาพ ภายใต้ หมวดหมู่ จากนั้นปิดกล่องโต้ตอบ

คุณสามารถเห็นข้อความที่แสดงของปุ่มคำสั่งเปลี่ยนไปตามภาพด้านล่างที่แสดง

4. คลิกขวาที่ปุ่มคำสั่งอีกครั้งจากนั้นคลิก ดูรหัส จากเมนูคลิกขวา

5. จากนั้น Microsoft Visual Basic สำหรับแอปพลิเคชัน โปรดแทนที่รหัสเดิมด้วยรหัส VBA ด้านล่างลงในไฟล์ รหัส หน้าต่าง

รหัส VBA: แทรกแถวใหม่ที่ว่างโดยอัตโนมัติโดยปุ่มคำสั่ง

Private Sub CommandButton1_Click()
    Dim rowNum As Integer
    On Error Resume Next
    rowNum = Application.InputBox(Prompt:="Enter Row Number where you want to add a row:", _
                                    Title:="Kutools for excel", Type:=1)
    Rows(rowNum & ":" & rowNum).Insert Shift:=xlDown
End Sub

หมายเหตุ: ในโค้ด CommanButton1 คือชื่อของปุ่มคำสั่งที่คุณสร้างขึ้น

6 กด อื่น ๆ + Q พร้อมกันเพื่อปิดไฟล์ Microsoft Visual Basic สำหรับแอปพลิเคชัน หน้าต่าง. และปิด โหมดการออกแบบ ภายใต้ ผู้พัฒนา แถบ

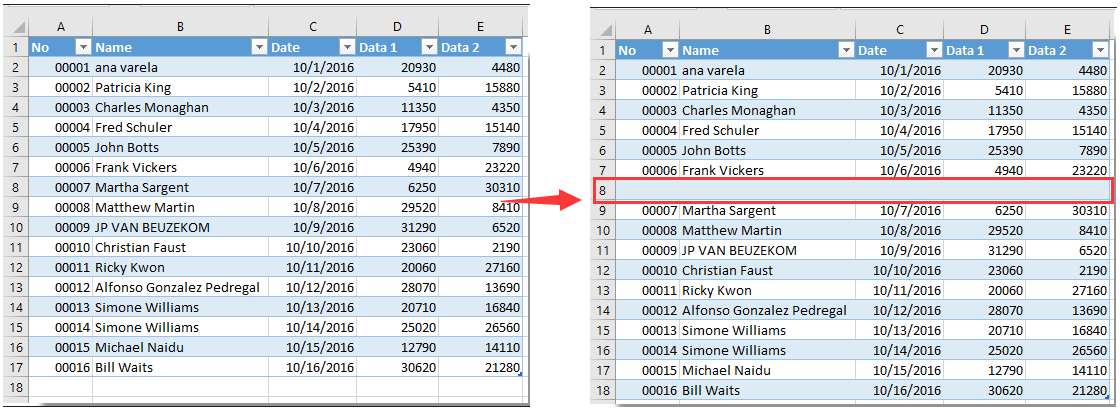
7. คลิกปุ่มคำสั่งที่แทรกและ a Kutools สำหรับ Excel กล่องโต้ตอบจะปรากฏขึ้น โปรดป้อนหมายเลขแถวที่คุณต้องการเพิ่มแถวใหม่ว่างจากนั้นคลิกที่ OK ปุ่ม. ดูภาพหน้าจอ:

จากนั้นแถวใหม่ว่างจะถูกแทรกลงในตำแหน่งที่ระบุของแผ่นงานของคุณตามภาพด้านล่างที่แสดง และยังคงการจัดรูปแบบเซลล์ของเซลล์ด้านบน


บทความที่เกี่ยวข้อง:

สุดยอดเครื่องมือเพิ่มผลผลิตในสำนักงาน

🤖 Kutools AI ผู้ช่วย: ปฏิวัติการวิเคราะห์ข้อมูลโดยยึดตาม: การดำเนินการที่ชาญฉลาด   |  สร้างรหัส  |  สร้างสูตรที่กำหนดเอง  |  วิเคราะห์ข้อมูลและสร้างแผนภูมิ  |  เรียกใช้ฟังก์ชัน Kutools...
คุณสมบัติยอดนิยม: ค้นหา เน้น หรือระบุรายการที่ซ้ำกัน   |  ลบแถวว่าง   |  รวมคอลัมน์หรือเซลล์โดยไม่สูญเสียข้อมูล   |   รอบโดยไม่มีสูตร ...
การค้นหาขั้นสูง: VLookup หลายเกณฑ์    VLookup หลายค่า  |   VLookup ข้ามหลายแผ่น   |   การค้นหาที่ไม่ชัดเจน ....
รายการแบบเลื่อนลงขั้นสูง: สร้างรายการแบบหล่นลงอย่างรวดเร็ว   |  รายการแบบหล่นลงขึ้นอยู่กับ   |  เลือกหลายรายการแบบหล่นลง ....
ผู้จัดการคอลัมน์: เพิ่มจำนวนคอลัมน์เฉพาะ  |  ย้ายคอลัมน์  |  สลับสถานะการมองเห็นของคอลัมน์ที่ซ่อนอยู่  |  เปรียบเทียบช่วงและคอลัมน์ ...
คุณสมบัติเด่น: กริดโฟกัส   |  มุมมองการออกแบบ   |   บาร์สูตรใหญ่    สมุดงานและตัวจัดการชีต   |  ห้องสมุดทรัพยากร (ข้อความอัตโนมัติ)   |  เลือกวันที่   |  รวมแผ่นงาน   |  เข้ารหัส/ถอดรหัสเซลล์    ส่งอีเมลตามรายการ   |  ซุปเปอร์ฟิลเตอร์   |   ตัวกรองพิเศษ (กรองตัวหนา/ตัวเอียง/ขีดทับ...) ...
ชุดเครื่องมือ 15 อันดับแรก12 ข้อความ เครื่องมือ (เพิ่มข้อความ, ลบอักขระ, ... )   |   50 + แผนภูมิ ประเภท (แผนภูมิ Gantt, ... )   |   40+ ใช้งานได้จริง สูตร (คำนวณอายุตามวันเกิด, ... )   |   19 การแทรก เครื่องมือ (ใส่ QR Code, แทรกรูปภาพจากเส้นทาง, ... )   |   12 การแปลง เครื่องมือ (ตัวเลขเป็นคำ, การแปลงสกุลเงิน, ... )   |   7 ผสานและแยก เครื่องมือ (แถวรวมขั้นสูง, แยกเซลล์, ... )   |   ... และอื่น ๆ

เพิ่มพูนทักษะ Excel ของคุณด้วย Kutools สำหรับ Excel และสัมผัสประสิทธิภาพอย่างที่ไม่เคยมีมาก่อน Kutools สำหรับ Excel เสนอคุณสมบัติขั้นสูงมากกว่า 300 รายการเพื่อเพิ่มประสิทธิภาพและประหยัดเวลา  คลิกที่นี่เพื่อรับคุณสมบัติที่คุณต้องการมากที่สุด...

รายละเอียด


แท็บ Office นำอินเทอร์เฟซแบบแท็บมาที่ Office และทำให้งานของคุณง่ายขึ้นมาก

  • เปิดใช้งานการแก้ไขและอ่านแบบแท็บใน Word, Excel, PowerPoint, ผู้จัดพิมพ์, Access, Visio และโครงการ
  • เปิดและสร้างเอกสารหลายรายการในแท็บใหม่ของหน้าต่างเดียวกันแทนที่จะเป็นในหน้าต่างใหม่
  • เพิ่มประสิทธิภาพการทำงานของคุณ 50% และลดการคลิกเมาส์หลายร้อยครั้งให้คุณทุกวัน!
Comments (26)
No ratings yet. Be the first to rate!
This comment was minimized by the moderator on the site
Bedankt voor je uitleg. Ik heb de formule toegepast maar bekom dat ik maar 1 lijn kan toevoegen. Daarna laat de knop het niet meer toe en moet ik eerst mijn toegevoegde rij verwijderen. Is er een manier om dit aan te passen?
This comment was minimized by the moderator on the site
Is there a way to make to row inset always below the last entry?
This comment was minimized by the moderator on the site
How do I do the opposite of this and create a button that will delete a row?
This comment was minimized by the moderator on the site
Hi Big Ant,

Here's the modified code to delete a specified row when the Command Button is clicked:


Private Sub CommandButton1_Click()
'Updated by Extendoffice 20230817
    Dim rowNum As Integer
    On Error Resume Next
    rowNum = Application.InputBox(Prompt:="Enter Row Number which you want to delete:", _
                                    Title:="Kutools for excel", Type:=1)
    If rowNum <> 0 Then
        Rows(rowNum).Delete Shift:=xlUp
    End If
End Sub
This comment was minimized by the moderator on the site
Criei uma linha e nomeei como spotB,
Mudei a altura da linha para 0,01 para ocultá-la (apenas por estética).
Criei um botão:
Application.Goto Reference:="spotB"
Selection.EntireRow.Insert

Problema resolvido.

Obrigado pelos códigos a Mah e crystal, mas eu tinha 8 títulos para separar, cada um inserindo linhas quando necessário ao usuário, e não queria nenhuma pergunta sobre quantidade de linhas, os usuários não leem perguntas e clicam logo em OK, depois reclamam...
This comment was minimized by the moderator on the site
... Testei os códigos acima, mas, como se trata de pessoas que vão usar, não é viável os box que pedem a linha e a quantidade, não dá...
This comment was minimized by the moderator on the site
Caros colegas, após pesquisar (bastante) na net não consegui encontrar um atalho, comando, código, nada, nada, que eu possa usar para inserir em uma macro APENAS uma forma de inserir uma linha ABAIXO da célula ativa. Isto porquê se eu gravar o endereço da célula, ele não muda, fica sempre na mesma célula e as seguintes não vão ficar corretamente abaixo, e se eu usar um endereço de célula fixo, a linha tem que ser inserida acima, mas não formata da forma desejada, que seria o formato das linhas de cima.

Acho que o código existe, só não encontro, já tentei várias formas, selecionando um fixo, subindo uma linha e pedindo para inserir após, mas as seguintes não funcionam de acordo.

Alguém poderia me ajudar?
This comment was minimized by the moderator on the site
Hi

I used the code but wanted to add rows with formulas, therefore I added the last line to be able to add the rows with formulas.
However, in my excel file and in column "F" I have a text which can be entered manually and would be different in different cases. Therefore, I would like to add rows below the reference row with keeping the formulas and values in all cells except the cell from column "F" which I would like to be copied as blank!
Could you please help me with what should I add to the underneath code to be able to have the cells of column "F" blank whenever I add a row with this code?
thanks in advance!

Private Sub CommandButton1_Click()
Dim xIntRrow As Integer
Dim rowNum As Integer
On Error Resume Next
rowNum = Application.InputBox(Prompt:="Enter Row Number where you want to add a row:", _
Title:="Kutools for excel", Type:=1)
xIntRrow = Application.InputBox(Prompt:="Type in the number of rows you want to insert", _
Title:="Kutools for excel", Type:=1)
Rows(rowNum + 1 & ":" & rowNum + 1).EntireRow.Resize(xIntRrow).Insert Shift:=xlShiftDown
Rows(rowNum).Resize(xIntRrow + 1).FillDown

End Sub
This comment was minimized by the moderator on the site
Hi Mah,
The following VBA code may do you a favor. Please give it a try. Thank you.

Private Sub CommandButton1_Click()
'Updated by Extendoffice 20220707
    Dim rowNum As Integer
    Dim xRg1, xRg2 As Range
    
    On Error Resume Next
    
    rowNum = Application.InputBox(Prompt:="Enter Row Number where you want to add a row:", _
                                    Title:="Kutools for excel", Type:=1)
    
    Rows(rowNum & ":" & rowNum).Insert Shift:=xlDown
    Rows((rowNum - 1) & ":" & (rowNum - 1)).Copy
    Rows(rowNum & ":" & rowNum).Select
    Selection.PasteSpecial Paste:=xlPasteAll, Operation:=xlNone, SkipBlanks:= _
        False, Transpose:=False
    Range("F" & rowNum).Value = ""
End Sub
This comment was minimized by the moderator on the site
Sub AddNewRow()


Private Sub CommandButton1_Click()

ActiveSheet.Unprotect Password:="1234"


Dim mySheets

Dim i As Long


mySheets = Array("Sheet2")


For i = LBound(mySheets) To UBound(mySheets)

With Sheets(mySheets(i))

.Range("B10").EntireRow.Insert Shift:=xlDown

.Range("B10:H10").Borders.Weight = xlThin

End With

Next i


ActiveSheet.Protect Password:="1234"


End Sub

I don't know if this will work for you. It worked quite well for me. I even left unprotected cells that you can input data and the formulas are still active. Took me a whole day to figure it out. replace "1234" with whatever password you feel like, "Sheet2" with the Sheet you are working with and input the range you want.
The code first unprotects the worksheet, adds row and protects the worksheet.
This comment was minimized by the moderator on the site
is it possible to create in a different sheet? I really need that
This comment was minimized by the moderator on the site
can possible insert multiple sheet row at one time click by this .
This comment was minimized by the moderator on the site
Hi,
The below code can help you solve the problem. Please have a try.

Private Sub CommandButton1_Click()
Dim xIntRrow As Integer
Dim rowNum As Integer
On Error Resume Next
rowNum = Application.InputBox(Prompt:="Enter Row Number where you want to add a row:", _
Title:="Kutools for excel", Type:=1)
xIntRrow = Application.InputBox(Prompt:="Type in the number of rows you want to insert", _
Title:="Kutools for excel", Type:=1)
Rows(rowNum + 1 & ":" & rowNum + 1).EntireRow.Resize(xIntRrow).Insert Shift:=xlShiftDown

End Sub
There are no comments posted here yet
Load More
Please leave your comments in English
Posting as Guest
×
Rate this post:
0   Characters
Suggested Locations