วิธีสร้างปฏิทินรายเดือน / รายปีใน Excel
ในบางครั้งคุณต้องสร้างปฏิทินเฉพาะเดือนหรือปีใน Excel คุณจะแก้ปัญหาได้อย่างรวดเร็วได้อย่างไร บทช่วยสอนนี้แนะนำเคล็ดลับในการสร้างปฏิทินรายเดือนหรือรายปีใน Excel อย่างรวดเร็ว
สร้างปฏิทินรายเดือนหรือรายปีโดยเทมเพลต Excel
สร้างปฏิทินรายเดือนหรือรายปีได้อย่างง่ายดายโดย Perpetual Calendar ![]()
 สร้างปฏิทินรายเดือนหรือรายปีโดยเทมเพลต Excel

ใน Excel คุณสามารถใช้เทมเพลตปฏิทินเพื่อสร้างปฏิทินรายเดือนหรือรายปี
1. ใน Excel 2010/2013 คลิก เนื้อไม่มีมัน > ใหม่ใน Excel 2007 คลิก ปุ่ม Office > ใหม่จากนั้นในส่วนด้านขวาของหน้าต่างที่โผล่ขึ้นมาให้พิมพ์ ปฏิทิน ลงในเครื่องมือค้นหา ดูภาพหน้าจอ:
ใน Excel 2010/2013
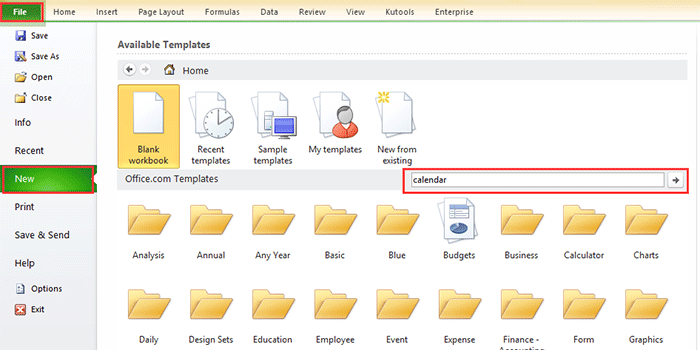
ใน Excel 2007

2 กด เข้าสู่จากนั้นปฏิทินหลายประเภทจะแสดงรายการในหน้าต่าง เลือกปฏิทิน XNUMX ประเภทที่คุณต้องการแล้วคลิก ดาวน์โหลด (หรือสร้าง) ในบานหน้าต่างด้านขวา ดูภาพหน้าจอ:

ตอนนี้ปฏิทินถูกสร้างขึ้นในสมุดงานใหม่ ดูภาพหน้าจอ:

สร้างปฏิทินรายเดือนโดย VBA
บางครั้งคุณต้องสร้างปฏิทิน 2015 เดือนสำหรับเดือนที่ระบุเช่น ม.ค. XNUMX อาจเป็นเรื่องยากที่จะหาเทมเพลตปฏิทินดังกล่าวด้วยวิธีการข้างต้น ที่นี่ฉันแนะนำรหัส VBA เพื่อช่วยคุณสร้างปฏิทินรายเดือนเฉพาะ
1 กด Alt + F11 กุญแจเพื่อเปิด Microsoft Visual Basic สำหรับแอปพลิเคชัน หน้าต่างคลิก สิ่งที่ใส่เข้าไป > โมดูลจากนั้นคัดลอกและวางโค้ด VBA ด้านล่างลงในหน้าต่าง
VBA: สร้างปฏิทินรายเดือน
Sub CalendarMaker()

       ' Unprotect sheet if had previous calendar to prevent error.
       ActiveSheet.Protect DrawingObjects:=False, Contents:=False, _
          Scenarios:=False
       ' Prevent screen flashing while drawing calendar.
       Application.ScreenUpdating = False
       ' Set up error trapping.
       On Error GoTo MyErrorTrap
       ' Clear area a1:g14 including any previous calendar.
       Range("a1:g14").Clear
       ' Use InputBox to get desired month and year and set variable
       ' MyInput.
       MyInput = InputBox("Type in Month and year for Calendar ")
       ' Allow user to end macro with Cancel in InputBox.
       If MyInput = "" Then Exit Sub
       ' Get the date value of the beginning of inputted month.
       StartDay = DateValue(MyInput)
       ' Check if valid date but not the first of the month
       ' -- if so, reset StartDay to first day of month.
       If Day(StartDay) <> 1 Then
           StartDay = DateValue(Month(StartDay) & "/1/" & _
               Year(StartDay))
       End If
       ' Prepare cell for Month and Year as fully spelled out.
       Range("a1").NumberFormat = "mmmm yyyy"
       ' Center the Month and Year label across a1:g1 with appropriate
       ' size, height and bolding.
       With Range("a1:g1")
           .HorizontalAlignment = xlCenterAcrossSelection
           .VerticalAlignment = xlCenter
           .Font.Size = 18
           .Font.Bold = True
           .RowHeight = 35
       End With
       ' Prepare a2:g2 for day of week labels with centering, size,
       ' height and bolding.
       With Range("a2:g2")
           .ColumnWidth = 11
           .VerticalAlignment = xlCenter
           .HorizontalAlignment = xlCenter
           .VerticalAlignment = xlCenter
           .Orientation = xlHorizontal
           .Font.Size = 12
           .Font.Bold = True
           .RowHeight = 20
       End With
       ' Put days of week in a2:g2.
       Range("a2") = "Sunday"
       Range("b2") = "Monday"
       Range("c2") = "Tuesday"
       Range("d2") = "Wednesday"
       Range("e2") = "Thursday"
       Range("f2") = "Friday"
       Range("g2") = "Saturday"
       ' Prepare a3:g7 for dates with left/top alignment, size, height
       ' and bolding.
       With Range("a3:g8")
           .HorizontalAlignment = xlRight
           .VerticalAlignment = xlTop
           .Font.Size = 18
           .Font.Bold = True
           .RowHeight = 21
       End With
       ' Put inputted month and year fully spelling out into "a1".
       Range("a1").Value = Application.Text(MyInput, "mmmm yyyy")
       ' Set variable and get which day of the week the month starts.
       DayofWeek = WeekDay(StartDay)
       ' Set variables to identify the year and month as separate
       ' variables.
       CurYear = Year(StartDay)
       CurMonth = Month(StartDay)
       ' Set variable and calculate the first day of the next month.
       FinalDay = DateSerial(CurYear, CurMonth + 1, 1)
       ' Place a "1" in cell position of the first day of the chosen
       ' month based on DayofWeek.
       Select Case DayofWeek
           Case 1
               Range("a3").Value = 1
           Case 2
               Range("b3").Value = 1
           Case 3
               Range("c3").Value = 1
           Case 4
               Range("d3").Value = 1
           Case 5
               Range("e3").Value = 1
           Case 6
               Range("f3").Value = 1
           Case 7
               Range("g3").Value = 1
       End Select
       ' Loop through range a3:g8 incrementing each cell after the "1"
       ' cell.
       For Each cell In Range("a3:g8")
           RowCell = cell.Row
           ColCell = cell.Column
           ' Do if "1" is in first column.
           If cell.Column = 1 And cell.Row = 3 Then
           ' Do if current cell is not in 1st column.
           ElseIf cell.Column <> 1 Then
               If cell.Offset(0, -1).Value >= 1 Then
                   cell.Value = cell.Offset(0, -1).Value + 1
                   ' Stop when the last day of the month has been
                   ' entered.
                   If cell.Value > (FinalDay - StartDay) Then
                       cell.Value = ""
                       ' Exit loop when calendar has correct number of
                       ' days shown.
                       Exit For
                   End If
               End If
           ' Do only if current cell is not in Row 3 and is in Column 1.
           ElseIf cell.Row > 3 And cell.Column = 1 Then
               cell.Value = cell.Offset(-1, 6).Value + 1
               ' Stop when the last day of the month has been entered.
               If cell.Value > (FinalDay - StartDay) Then
                   cell.Value = ""
                   ' Exit loop when calendar has correct number of days
                   ' shown.
                   Exit For
               End If
           End If
       Next

       ' Create Entry cells, format them centered, wrap text, and border
       ' around days.
       For x = 0 To 5
           Range("A4").Offset(x * 2, 0).EntireRow.Insert
           With Range("A4:G4").Offset(x * 2, 0)
               .RowHeight = 65
               .HorizontalAlignment = xlCenter
               .VerticalAlignment = xlTop
               .WrapText = True
               .Font.Size = 10
               .Font.Bold = False
               ' Unlock these cells to be able to enter text later after
               ' sheet is protected.
               .Locked = False
           End With
           ' Put border around the block of dates.
           With Range("A3").Offset(x * 2, 0).Resize(2, _
           7).Borders(xlLeft)
               .Weight = xlThick
               .ColorIndex = xlAutomatic
           End With

           With Range("A3").Offset(x * 2, 0).Resize(2, _
           7).Borders(xlRight)
               .Weight = xlThick
               .ColorIndex = xlAutomatic
           End With
           Range("A3").Offset(x * 2, 0).Resize(2, 7).BorderAround _
              Weight:=xlThick, ColorIndex:=xlAutomatic
       Next
       If Range("A13").Value = "" Then Range("A13").Offset(0, 0) _
          .Resize(2, 8).EntireRow.Delete
       ' Turn off gridlines.
       ActiveWindow.DisplayGridlines = False
       ' Protect sheet to prevent overwriting the dates.
       ActiveSheet.Protect DrawingObjects:=True, Contents:=True, _
          Scenarios:=True

       ' Resize window to show all of calendar (may have to be adjusted
       ' for video configuration).
       ActiveWindow.WindowState = xlMaximized
       ActiveWindow.ScrollRow = 1

       ' Allow screen to redraw with calendar showing.
       Application.ScreenUpdating = True
       ' Prevent going to error trap unless error found by exiting Sub
       ' here.
       Exit Sub
   ' Error causes msgbox to indicate the problem, provides new input box,
   ' and resumes at the line that caused the error.
   MyErrorTrap:
       MsgBox "You may not have entered your Month and Year correctly." _
           & Chr(13) & "Spell the Month correctly" _
           & " (or use 3 letter abbreviation)" _
           & Chr(13) & "and 4 digits for the Year"
       MyInput = InputBox("Type in Month and year for Calendar")
       If MyInput = "" Then Exit Sub
       Resume
   End Sub
VBA มาจากเว็บนี้ https://support.microsoft.com/en-us/kb/150774
2 กด F5 คีย์หรือ วิ่ง และกล่องโต้ตอบจะปรากฏขึ้นเพื่อเตือนให้คุณพิมพ์เดือนที่คุณต้องการสร้างปฏิทินดูภาพหน้าจอ:

3 คลิก OK. ตอนนี้ปฏิทินมกราคม 2015 ถูกสร้างขึ้นในแผ่นงานที่ใช้งานอยู่

แต่ด้วยวิธีการข้างต้นมีข้อ จำกัด บางประการเช่นหากคุณต้องการสร้างปฏิทินตั้งแต่เดือนมกราคมถึงพฤษภาคมพร้อมกันคุณต้องสร้างปฏิทินใน XNUMX ครั้งด้วยสองวิธีข้างต้น ตอนนี้ฉันแนะนำยูทิลิตี้ที่มีประโยชน์เพื่อแก้ปัญหาอย่างรวดเร็วและง่ายดาย
สร้างปฏิทินรายเดือนหรือรายปีได้อย่างง่ายดายโดย Perpetual Calendar
ปฏิทินตลอดไป เป็นหนึ่งในยูทิลิตี้ที่มีประสิทธิภาพใน Kutools สำหรับ Excelและยังช่วยให้คุณสร้างปฏิทินรายเดือนหรือรายปีใน Excel พร้อมกันได้อย่างรวดเร็ว
| Kutools สำหรับ Excel, ที่มีมากกว่า 300 ฟังก์ชั่นที่มีประโยชน์ทำให้งานของคุณง่ายขึ้น | ||
1 คลิก Enterprise > แผ่นงาน > ปฏิทินตลอดไป. ดูภาพหน้าจอ:

2. ในกล่องโต้ตอบ popping ระบุระยะเวลาของเดือนที่คุณต้องการสร้างปฏิทินแล้วคลิก สร้างบัญชีตัวแทน. ดูภาพหน้าจอ:

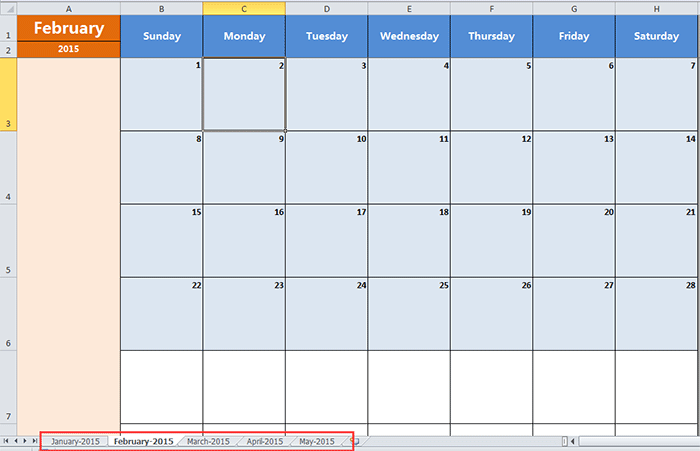
จากนั้นสมุดงานใหม่จะถูกสร้างขึ้นโดยมีแผ่นงานปฏิทินห้าแผ่น ดูภาพหน้าจอ:
เคล็ดลับ:
หากคุณต้องการสร้างปฏิทินเฉพาะเดือนเพียงแค่เลือกเดือนเดียวกันทั้งในกล่องข้อความจากและถึงในกล่องโต้ตอบ
คลิกที่นี่เพื่อทราบข้อมูลเพิ่มเติมเกี่ยวกับ Perpetual Calendar
สุดยอดเครื่องมือเพิ่มผลผลิตในสำนักงาน
เพิ่มพูนทักษะ Excel ของคุณด้วย Kutools สำหรับ Excel และสัมผัสประสิทธิภาพอย่างที่ไม่เคยมีมาก่อน Kutools สำหรับ Excel เสนอคุณสมบัติขั้นสูงมากกว่า 300 รายการเพื่อเพิ่มประสิทธิภาพและประหยัดเวลา คลิกที่นี่เพื่อรับคุณสมบัติที่คุณต้องการมากที่สุด...
")
แท็บ Office นำอินเทอร์เฟซแบบแท็บมาที่ Office และทำให้งานของคุณง่ายขึ้นมาก
- เปิดใช้งานการแก้ไขและอ่านแบบแท็บใน Word, Excel, PowerPoint, ผู้จัดพิมพ์, Access, Visio และโครงการ
- เปิดและสร้างเอกสารหลายรายการในแท็บใหม่ของหน้าต่างเดียวกันแทนที่จะเป็นในหน้าต่างใหม่
- เพิ่มประสิทธิภาพการทำงานของคุณ 50% และลดการคลิกเมาส์หลายร้อยครั้งให้คุณทุกวัน!
")