ไปยังเนื้อหาหลัก

วิธีการส่งออกภาพทั้งหมดในครั้งเดียวจาก Excel?

สมมติว่าคุณมีรูปภาพจำนวนมากในเวิร์กบุ๊กของคุณและต้องการบันทึกลงในโฟลเดอร์เฉพาะในแต่ละครั้ง โดยปกติแล้ว คุณสามารถคัดลอกและวางรูปภาพทีละภาพเพื่อบันทึกได้ แต่จะใช้เวลานานในการคัดลอกและวาง แบบนี้ซ้ำๆ ที่นี่ฉันจะแนะนำเคล็ดลับบางอย่างในการแก้ปัญหานี้


ส่งออกรูปภาพทั้งหมดในครั้งเดียวจาก Excel ด้วยฟังก์ชันบันทึกเป็น

ด้วย Excel ในตัว บันทึกเป็น ฟังก์ชั่น คุณสามารถบันทึกสมุดงานเป็น หน้าเว็บ เพื่อบันทึกรูปภาพทั้งหมด รวมทั้งแผนภูมิ รูปร่าง และวัตถุอื่นๆ ในโฟลเดอร์ กรุณาทำดังนี้

1. เปิดสมุดงานที่มีรูปภาพที่คุณต้องการบันทึก คลิก เนื้อไม่มีมัน > บันทึกเป็น > เรียกดู

2 ใน บันทึกเป็น คุณต้อง:

2.1) เลือกโฟลเดอร์เพื่อบันทึกภาพที่ส่งออก;
2.2) เลือก หน้าเว็บ จากรายการดรอปดาวน์บันทึกเป็นประเภท
2.3) คลิกปุ่ม ลด ปุ่ม

3. ในการโผล่ขึ้นมา Microsoft Excel ใหคลิกปุ the ม ใช่ ปุ่ม

4. เปิดโฟลเดอร์ที่บันทึกไฟล์ที่ส่งออกและคุณสามารถดูโฟลเดอร์และไฟล์รูปแบบ HTML ที่อยู่ภายใน รูปภาพทั้งหมดในสมุดงาน รวมถึงแผนภูมิ รูปร่าง หรือวัตถุ จะถูกบันทึกไว้ในโฟลเดอร์นี้

5. คุณสามารถเก็บรูปภาพที่คุณต้องการไว้ในโฟลเดอร์และลบรูปภาพอื่นที่คุณไม่ต้องการได้


ส่งออกรูปภาพทั้งหมดในครั้งเดียวจาก Excel ได้อย่างง่ายดายด้วยเครื่องมือที่น่าทึ่ง

วิธีการข้างต้นจะดึงออบเจ็กต์ทั้งหมดออกจากเวิร์กบุ๊ก บางทีคุณอาจไม่ต้องการบางส่วน ถ้าคุณมี Kutools สำหรับ Excel ติดตั้งใน Excel ซึ่งเป็นไฟล์ ส่งออกกราฟิก คุณสมบัติอาจช่วยให้คุณบันทึกเฉพาะรูปภาพที่คุณต้องการ

หลังจากการติดตั้ง Kutools สำหรับ Excelโปรดดำเนินการดังนี้:

1 คลิก Kutools พลัส > นำเข้าส่งออก > ส่งออกกราฟิก:

2 ใน ส่งออกกราฟิก โปรดกำหนดค่าดังต่อไปนี้:

2.1) เลือก ภาพ จาก ประเภท รายการแบบหล่นลง
ทิปส์: ตามค่าเริ่มต้น กราฟิกทั้งหมดรวมถึงแผนภูมิ รูปภาพ และรูปร่างในเวิร์กบุ๊กปัจจุบันจะแสดงรายการ
2.2) ใน บันทึกไดเรกทอรี คลิกแท็บ ปุ่มเพื่อเลือกโฟลเดอร์เพื่อบันทึกรูปภาพที่ส่งออกของคุณ
2.3) ใน รูปแบบการส่งออก รายการแบบหล่นลง เลือกประเภทของภาพที่คุณต้องการส่งออกเป็น;
2.4) คลิก ตกลง

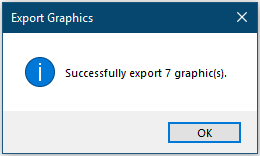
3. จากนั้นกล่องโต้ตอบจะปรากฏขึ้นเพื่อแจ้งจำนวนภาพที่ส่งออกได้สำเร็จ ให้คลิกที่ OK ปุ่ม

ตอนนี้คุณสามารถไปที่โฟลเดอร์ปลายทางและตรวจสอบภาพที่ส่งออก

กรุณาคลิ้ก ส่งออกกราฟิก เพื่อทราบข้อมูลเพิ่มเติมเกี่ยวกับคุณลักษณะนี้

ก่อนที่จะใช้ Kutools สำหรับ Excelโปรด ดาวน์โหลดและติดตั้งในตอนแรก.


ส่งออกรูปภาพและเปลี่ยนชื่อด้วยค่าเซลล์ที่อยู่ติดกัน

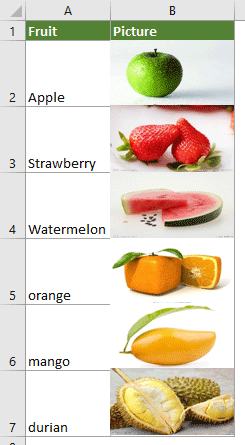
ดังที่แสดงในภาพหน้าจอด้านล่าง มีสองคอลัมน์ คอลัมน์แรกมีรายชื่อผลไม้ และอีกคอลัมน์หนึ่งมีรูปภาพผลไม้ที่เกี่ยวข้อง หากต้องการส่งออกรูปภาพเหล่านี้และตั้งชื่อโดยอัตโนมัติด้วยชื่อผลไม้ที่เกี่ยวข้อง คุณสามารถลองใช้โค้ด VBA ในส่วนนี้

1. ในเวิร์กชีตที่คุณต้องการส่งออกรูปภาพ ให้กด อื่น ๆ + F11 คีย์เพื่อเปิด Microsoft Visual Basic สำหรับแอปพลิเคชัน หน้าต่าง

2 ใน Microsoft Visual Basic สำหรับแอปพลิเคชัน หน้าต่างคลิก สิ่งที่ใส่เข้าไป > โมดูล. จากนั้นคัดลอก VBA ต่อไปนี้ลงในหน้าต่างโมดูล

รหัส VBA: ส่งออกรูปภาพในคอลัมน์และตั้งชื่อโดยอัตโนมัติ

Sub ExportImages_ExtendOffice()
'Updated by Extendoffice 20220308
    Dim xStrPath As String
    Dim xStrImgName As String
    Dim xImg As Shape
    Dim xObjChar As ChartObject
    Dim xFD As FileDialog
    Set xFD = Application.FileDialog(msoFileDialogFolderPicker)
    xFD.Title = "Please select a folder to save the pictures" & " - ExtendOffice"
    If xFD.Show = -1 Then
       xStrPath = xFD.SelectedItems.Item(1) & "\"
    Else
        Exit Sub
    End If
    
    On Error Resume Next
    For Each xImg In ActiveSheet.Shapes
        If xImg.TopLeftCell.Column = 2 Then
        xStrImgName = xImg.TopLeftCell.Offset(0, -1).Value
        If xStrImgName <> "" Then
            xImg.Select
            
            Selection.Copy
            Set xObjChar = ActiveSheet.ChartObjects.Add(0, 0, xImg.Width, xImg.Height)
            With xObjChar
                .Border.LineStyle = xlLineStyleNone
                .Activate
                ActiveChart.Paste
                .Chart.Export xStrPath & xStrImgName & ".png"
                .Delete
            End With
        End If
        End If
    Next
End Sub

หมายเหตุ:

1) จำนวน 2 ในบรรทัด "ถ้า xImg.TopLeftCell.Column = 2 แล้ว” หมายถึงหมายเลขคอลัมน์ที่คุณต้องการส่งออกรูปภาพ
2) จำนวน -1 ในบรรทัด "xStrImgName = xImg.TopLeftCell.Offset(0, -1).ค่า” ระบุว่าคุณจะตั้งชื่อรูปภาพด้วยค่าของเซลล์ด้านซ้ายที่อยู่ติดกัน

3 กด F5 คีย์เพื่อเรียกใช้รหัส ในหน้าต่างที่เปิดขึ้นมา ให้เลือกโฟลเดอร์ที่จะบันทึกรูปภาพ จากนั้นคลิก ตกลง

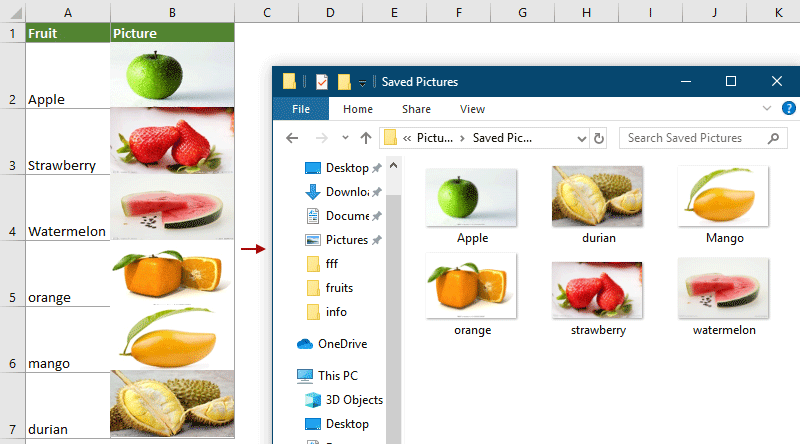
จากนั้นรูปภาพทั้งหมดในคอลัมน์ที่ระบุจะถูกส่งออกและตั้งชื่อโดยอัตโนมัติด้วยค่าเซลล์ที่อยู่ติดกันตามที่คุณระบุ


บทความที่เกี่ยวข้อง:

วิธีการส่งออกแผนภูมิไปยังกราฟิกใน Excel

สุดยอดเครื่องมือเพิ่มผลผลิตในสำนักงาน

🤖 Kutools AI ผู้ช่วย: ปฏิวัติการวิเคราะห์ข้อมูลโดยยึดตาม: การดำเนินการที่ชาญฉลาด   |  สร้างรหัส  |  สร้างสูตรที่กำหนดเอง  |  วิเคราะห์ข้อมูลและสร้างแผนภูมิ  |  เรียกใช้ฟังก์ชัน Kutools...
คุณสมบัติยอดนิยม: ค้นหา เน้น หรือระบุรายการที่ซ้ำกัน   |  ลบแถวว่าง   |  รวมคอลัมน์หรือเซลล์โดยไม่สูญเสียข้อมูล   |   รอบโดยไม่มีสูตร ...
การค้นหาขั้นสูง: VLookup หลายเกณฑ์    VLookup หลายค่า  |   VLookup ข้ามหลายแผ่น   |   การค้นหาที่ไม่ชัดเจน ....
รายการแบบเลื่อนลงขั้นสูง: สร้างรายการแบบหล่นลงอย่างรวดเร็ว   |  รายการแบบหล่นลงขึ้นอยู่กับ   |  เลือกหลายรายการแบบหล่นลง ....
ผู้จัดการคอลัมน์: เพิ่มจำนวนคอลัมน์เฉพาะ  |  ย้ายคอลัมน์  |  สลับสถานะการมองเห็นของคอลัมน์ที่ซ่อนอยู่  |  เปรียบเทียบช่วงและคอลัมน์ ...
คุณสมบัติเด่น: กริดโฟกัส   |  มุมมองการออกแบบ   |   บาร์สูตรใหญ่    สมุดงานและตัวจัดการชีต   |  ห้องสมุดทรัพยากร (ข้อความอัตโนมัติ)   |  เลือกวันที่   |  รวมแผ่นงาน   |  เข้ารหัส/ถอดรหัสเซลล์    ส่งอีเมลตามรายการ   |  ซุปเปอร์ฟิลเตอร์   |   ตัวกรองพิเศษ (กรองตัวหนา/ตัวเอียง/ขีดทับ...) ...
ชุดเครื่องมือ 15 อันดับแรก12 ข้อความ เครื่องมือ (เพิ่มข้อความ, ลบอักขระ, ... )   |   50 + แผนภูมิ ประเภท (แผนภูมิ Gantt, ... )   |   40+ ใช้งานได้จริง สูตร (คำนวณอายุตามวันเกิด, ... )   |   19 การแทรก เครื่องมือ (ใส่ QR Code, แทรกรูปภาพจากเส้นทาง, ... )   |   12 การแปลง เครื่องมือ (ตัวเลขเป็นคำ, การแปลงสกุลเงิน, ... )   |   7 ผสานและแยก เครื่องมือ (แถวรวมขั้นสูง, แยกเซลล์, ... )   |   ... และอื่น ๆ

เพิ่มพูนทักษะ Excel ของคุณด้วย Kutools สำหรับ Excel และสัมผัสประสิทธิภาพอย่างที่ไม่เคยมีมาก่อน Kutools สำหรับ Excel เสนอคุณสมบัติขั้นสูงมากกว่า 300 รายการเพื่อเพิ่มประสิทธิภาพและประหยัดเวลา  คลิกที่นี่เพื่อรับคุณสมบัติที่คุณต้องการมากที่สุด...

รายละเอียด


แท็บ Office นำอินเทอร์เฟซแบบแท็บมาที่ Office และทำให้งานของคุณง่ายขึ้นมาก

  • เปิดใช้งานการแก้ไขและอ่านแบบแท็บใน Word, Excel, PowerPoint, ผู้จัดพิมพ์, Access, Visio และโครงการ
  • เปิดและสร้างเอกสารหลายรายการในแท็บใหม่ของหน้าต่างเดียวกันแทนที่จะเป็นในหน้าต่างใหม่
  • เพิ่มประสิทธิภาพการทำงานของคุณ 50% และลดการคลิกเมาส์หลายร้อยครั้งให้คุณทุกวัน!
Comments (24)
Rated 5 out of 5 · 1 ratings
This comment was minimized by the moderator on the site
WaW Amazing ! Thanks a lot ! It works perfect for me !
I couldn't insert Milan's code inside the first one, so maybe you could update with the two codes combined ?
It is because my pictures are so small...
Rated 5 out of 5
This comment was minimized by the moderator on the site
Thank you! The code does the job. The only downside is it exports images in displayed size, not in original size. And it's often the case, when an otherwise large image is scaled down to fit in the cell. Is there a way to tweak this code to export original size images?

Sub ExportImages_ExtendOffice()
'Updated by Extendoffice 20220308
    Dim xStrPath As String
    Dim xStrImgName As String
    Dim xImg As Shape
    Dim xObjChar As ChartObject
    Dim xFD As FileDialog
    Set xFD = Application.FileDialog(msoFileDialogFolderPicker)
    xFD.Title = "Please select a folder to save the pictures" & " - ExtendOffice"
    If xFD.Show = -1 Then
       xStrPath = xFD.SelectedItems.Item(1) & "\"
    Else
        Exit Sub
    End If
    
    On Error Resume Next
    For Each xImg In ActiveSheet.Shapes
        If xImg.TopLeftCell.Column = 2 Then
        xStrImgName = xImg.TopLeftCell.Offset(0, -1).Value
        If xStrImgName <> "" Then
            xImg.Select
            
            Selection.Copy
            Set xObjChar = ActiveSheet.ChartObjects.Add(0, 0, xImg.Width, xImg.Height)
            With xObjChar
                .Border.LineStyle = xlLineStyleNone
                .Activate
                ActiveChart.Paste
                .Chart.Export xStrPath & xStrImgName & ".png"
                .Delete
            End With
        End If
        End If
    Next
End Sub
This comment was minimized by the moderator on the site
same issue...
just a quick edit:
If xStrImgName <> "" Then
            xImg.Select
          [b]  xImg.ScaleHeight 1#, True, msoScaleFromTopLeft
            xImg.ScaleWidth 1#, True, msoScaleFromTopLeft[/b]


this will resize all images, so you have to close the file afterwards without saving to preserve the initial vie, but the pictures will go out in their original size.
This comment was minimized by the moderator on the site
fixed, thank you anyway:

Sub ExportImages_ExtendOffice()
'Updated by Extendoffice 20220308
    Dim xStrPath As String
    Dim xStrImgName As String
    Dim xImg As Shape
    Dim xObjChar As ChartObject
    Dim xFD As FileDialog
    Set xFD = Application.FileDialog(msoFileDialogFolderPicker)
    xFD.Title = "Please select a folder to save the pictures" & " - ExtendOffice"
    If xFD.Show = -1 Then
       xStrPath = xFD.SelectedItems.Item(1) & "\"
    Else
        Exit Sub
    End If
    
    On Error Resume Next
    For Each xImg In ActiveSheet.Shapes
        If xImg.TopLeftCell.Column = 2 Then
        xStrImgName = xImg.TopLeftCell.Offset(0, -1).Value
        If xStrImgName <> "" Then
            xImg.Select
'            Selection.Copy
            Selection.CopyPicture Appearance:=xlScreen, Format:=xlPicture
            Set xObjChar = ActiveSheet.ChartObjects.Add(0, 0, xImg.Width, xImg.Height)
            With xObjChar
                .Parent.ShapeRange.Line.Visible = msoFalse
                .Border.LineStyle = xlLineStyleNone
'                .Activate
                .Select
                ActiveChart.Paste
                .Chart.Export xStrPath & xStrImgName & ".png"
                .Delete
            End With
        End If
        End If
    Next
End Sub
This comment was minimized by the moderator on the site
Thank you for this great tool, It saved me a ton of time. But I've ran into an issue that most of the photos are saved as blank photos as shown in the attached screenshot. Appreciate the help. Thank you
This comment was minimized by the moderator on the site
Hello, Mohamed
Did your problem occur when using Kutools for Excel? If so, could you upload your workbook file here if you don't mind?
So that, we can check where the problem is?
Thank you!
This comment was minimized by the moderator on the site
I am using the code given in the " Export images and rename them with the adjacent cell values" part of the article. When I run this code I get the following error: "Run-time error '91': Object variable or With block variable not set."

When I click "debug" it points me to line 9 of the code :
xFD.Title = "Please select a folder to save the pictures" & " - ExtendOffice"

Do you have a solution to this? Your article is the only solution I can find.

I am using Excel for Mac.
This comment was minimized by the moderator on the site
Hello, Dylan,

Sorry, our code is only applicable to Microsoft Excel, maybe you can try the code in Microsoft Excel.
Thank you!
This comment was minimized by the moderator on the site
I am using Microsoft Excel on Mac OSX.
This comment was minimized by the moderator on the site
I am also getting this issue using a Mac - Dylan were you able to resolve?

Are we meant to change something with the below that it is picking up as a bug?

xFD.Title = "Please select a folder to save the pictures" & " - ExtendOffice"
This comment was minimized by the moderator on the site
Hello, thank you for this article. When I execute the code above from Export images and rename them with the adjacent cell values, I get the following error message: Run-time error '91': Object variable or With block variable not set. When I click debug, it highlights line 9 of the code. Do you know why this is happening? FYI I am using Excel for Mac OSX. Thank you
This comment was minimized by the moderator on the site
Τέλειο εργαλείο! Όμως το μέγεθος-ανάλυση της εικόνας μικραίνει . Υπάρχει τρόπος να διατηρηθεί η αρχική ανάλυση ?
This comment was minimized by the moderator on the site
Bonjour le code VBA m'enregistre des images blanches je ne comprends pas pourquoi. quelqu'un a une solution ?
This comment was minimized by the moderator on the site
Hello, Sophie,
The code in this article can work well in my Excel, could you upload your Excel file here if you don't mind? So we can help to check the problem for you.
Or you can describe your problem more clear and detailed.
Thank you!
This comment was minimized by the moderator on the site
hallo skyyang, ich habe seit neulich das gleiche problem, viele leere *.png dateien.
Your text to link
bei jedem exportversuch werden andere bilder nicht richtig erfasst.
mfg und danke
This comment was minimized by the moderator on the site
Hello, milan bojic
Which Excel version do you use?
I have tried the code in your workbook, it works well, and all the images in your workbook are exported in the folder and renamed based on the cell value, see screenshot:
https://www.extendoffice.com/images/stories/comments/comment-skyyang/doc-export-images-1.png
This comment was minimized by the moderator on the site
Hello skyyang, it's office 365. your code was working fine until 2 weeks ago, not anymore, see screenshot. meanwhile i found something similar that works, (combined with yours), maybe you can use that for your code.

screenshot:
[img]https://drive.google.com/file/d/1vfRlhpyzqg7QNFeYl53mTvNON3gIrFwv/view?usp=sharing[/img]


Sub BilderExportieren()
    Dim shaBild As Shape
    Dim strZielpfad As String
    strZielpfad = "c:\Tuerliste\img3\" '<== Zielpfad entsprechend anpassen!!
    For Each shaBild In ActiveSheet.Shapes
        BildExportShape shaBild, strZielpfad
    Next shaBild
End Sub

Sub BildExportShape(shaBild As Shape, strZiel As String)
    Dim xStrImgName As String
    Dim chDiagramm As ChartObject
    xStrImgName = shaBild.TopLeftCell.Offset(0, -1).Value
    Application.ScreenUpdating = False
    shaBild.CopyPicture Appearance:=xlScreen, Format:=xlPicture
    Set chDiagramm = ActiveSheet.ChartObjects.Add(0, 0, shaBild.Width, shaBild.Height)
    With chDiagramm.Chart
        ' erforderlich bei Excel2010, da Diagrammfläche automatisch mit Rahmen erstellt wird
        .Parent.ShapeRange.Line.Visible = msoFalse
        ' bei Excel2016 muss die Diagrammfläche selektiert vor .Paste werden - andernfalls ist das Bild leer
        If Val(Application.Version) = 16 Then .ChartArea.Select
        .Paste
        .Export Filename:=strZiel & xStrImgName & ".png", FilterName:="png"
    End With
    chDiagramm.Delete
    Set chDiagramm = Nothing
    Set shaBild = Nothing
    Application.ScreenUpdating = True
End Sub


Thank you anyway
Milan Bojic
This comment was minimized by the moderator on the site
Hello, milan bojic,
Thanks for your code, maybe it can help others in the future. 🙂
This comment was minimized by the moderator on the site
This is great, if I wanted to grab the background colour of a cell (instead of an image) and save that as a image named with the adjacent cell how would that be an easy change to the code?
This comment was minimized by the moderator on the site
Hi Tom,Do you mean saving the background color of the cell as an image and named it with the adjacent cell value?Sorry can't help you with that.
This comment was minimized by the moderator on the site
thanks a lot it helped me a lot
There are no comments posted here yet
Load More
Please leave your comments in English
Posting as Guest
×
Rate this post:
0   Characters
Suggested Locations